鸢( yuān )尾花种类预测
使用K-Nearest Neighbor(KNN)算法对鸢尾花的种类进行分类,并测量花的特征。
鸢尾花种类
Iris数据集是常用的分类实验数据集,由Fisher, 1936收集整理。Iris也称鸢尾花卉数据集,是一类多重变量分析的数据集。关于数据集的具体介绍:
scikit-learn数据集介绍
scikit-learn数据集API
sklearn.datasets加载获取流行数据集datasets.load_*()获取小规模数据集,数据包含在datasets里datasets.fetch_*(data_home=None)
获取大规模数据集,需要从网络上下载,函数的第一个参数是data_home,表示数据集下载的目录,默认是~/scikit_learn_data/
sklearn小数据集
sklearn.datasets.load_iris()加载并返回鸢尾花数据集
| 名称 | 数量 |
|---|---|
| 类别 | 3 |
| 特征 | 4 |
| 样本数量 | 150 |
| 每个类别数量 | 50 |
sklearn大数据集
sklearn.datasets.fetch_20newsgroups(data_home=None,subset=‘train’)subset:'train'或者'test','all',可选,选择要加载的数据集。- 训练集的“训练”,测试集的“测试”,两者的“全部”
sklearn数据集返回值介绍
load和fetch返回的数据类型datasets.base.Bunch(字典格式)data:特征数据数组,是[n_samples * n_features]的二维numpy.ndarray数组target:标签数组,是n_samples的一维numpy.ndarray数组DESCR:数据描述feature_names:特征名,新闻数据,手写数字、回归数据集没有target_names:标签名
from sklearn.datasets import load_iris # 获取鸢尾花数据集 iris = load_iris() print("鸢尾花数据集的返回值:\n", iris) # 返回值是一个继承自字典的Bench print("鸢尾花的特征值:\n", iris["data"]) print("鸢尾花的目标值:\n", iris.target) print("鸢尾花特征的名字:\n", iris.feature_names) print("鸢尾花目标值的名字:\n", iris.target_names) print("鸢尾花的描述:\n", iris.DESCR) 查看数据分布
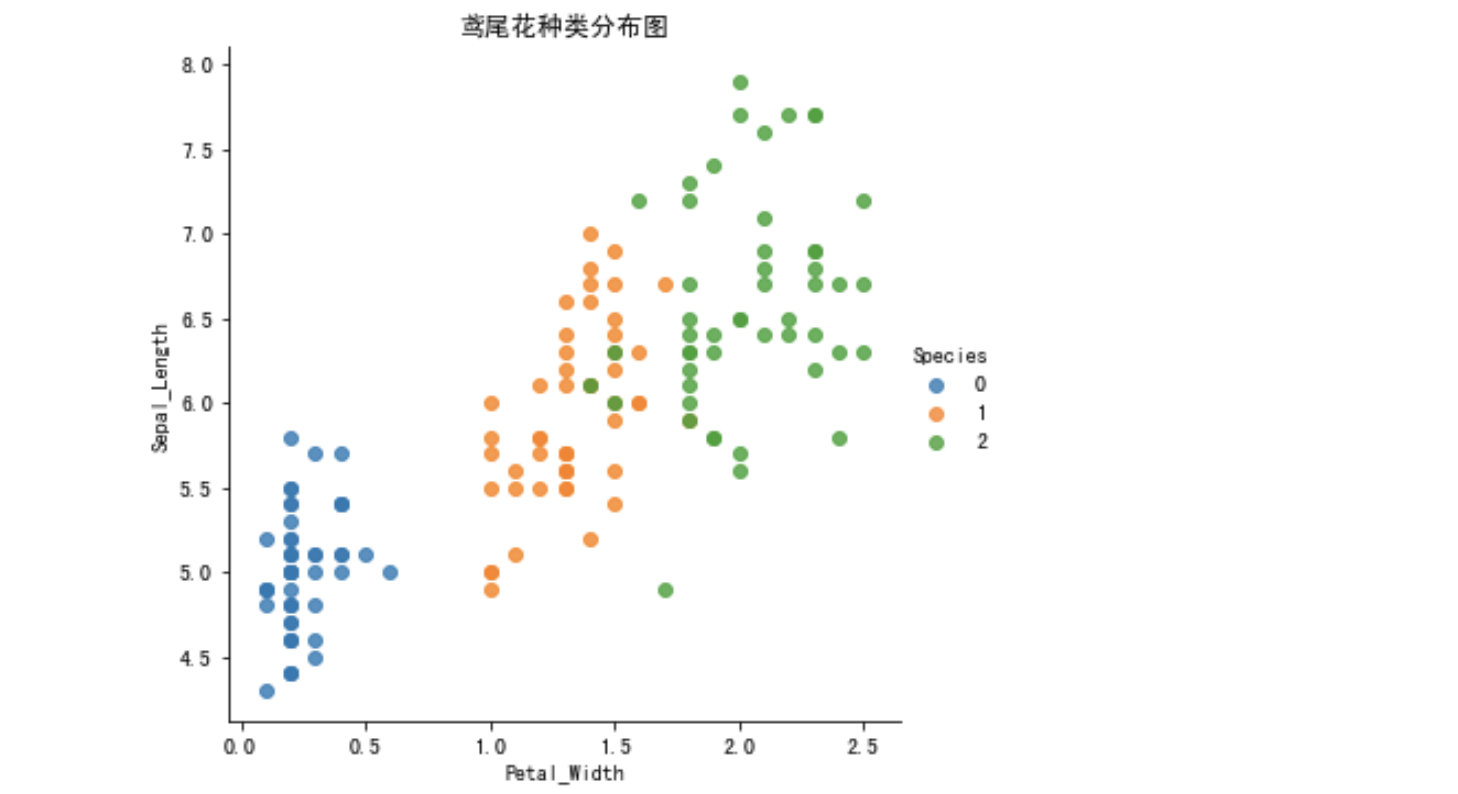
通过创建一些图,以查看不同类别是如何通过特征来区分的。 在理想情况下,标签类将由一个或多个特征对完美分隔。 在现实世界中,这种理想情况很少会发生。
seaborn介绍
Seaborn 是基于 Matplotlib 核心库进行了更高级的 API 封装,可以让你轻松地画出更漂亮的图形。而 Seaborn 的漂亮主要体现在配色更加舒服、以及图形素的样式更加细腻。
-
安装
pip3 install seaborn -
seaborn.lmplot()是一个非常有用的方法,它会在绘制二维散点图时,自动完成回归拟合sns.lmplot()里的 x, y 分别代表横纵坐标的列名data=是关联到数据集hue=*代表按照species即花的类别分类显示fit_reg=是否进行线性拟合
%matplotlib inline # 内嵌绘图 import seaborn as sns import matplotlib.pyplot as plt import pandas as pd # 把数据转换成dataframe的格式 iris_d = pd.DataFrame(iris['data'], columns = ['Sepal_Length', 'Sepal_Width', 'Petal_Length', 'Petal_Width']) iris_d['Species'] = iris.target def plot_iris(iris, col1, col2): sns.lmplot(x = col1, y = col2, data = iris, hue = "Species", fit_reg = False) plt.xlabel(col1) plt.ylabel(col2) plt.title('鸢尾花种类分布图') plt.show() plot_iris(iris_d, 'Petal_Width', 'Sepal_Length') 数据集的划分
机器学习一般的数据集会划分为两个部分:
- 训练数据:用于训练,构建模型
- 测试数据:在模型检验时使用,用于评估模型是否有效
划分比例:
- 训练集:70% 80% 75%
- 测试集:30% 20% 25%
数据集划分api
sklearn.model_selection.train_test_split(arrays, *options)- 参数:
x数据集的特征值
y数据集的标签值
test_size测试集的大小,一般为float
random_state随机数种子,不同的种子会造成不同的随机采样结果。相同的种子采样结果相同。 return
x_train, x_test, y_train, y_test
- 参数:
from sklearn.datasets import load_iris from sklearn.model_selection import train_test_split # 1、获取鸢尾花数据集 iris = load_iris() # 对鸢尾花数据集进行分割 # 训练集的特征值x_train 测试集的特征值x_test 训练集的目标值y_train 测试集的目标值y_test x_train, x_test, y_train, y_test = train_test_split(iris.data, iris.target, random_state=22) print("x_train:\n", x_train.shape) # 随机数种子 x_train1, x_test1, y_train1, y_test1 = train_test_split(iris.data, iris.target, random_state=6) x_train2, x_test2, y_train2, y_test2 = train_test_split(iris.data, iris.target, random_state=6) print("如果随机数种子不一致:\n", x_train == x_train1) print("如果随机数种子一致:\n", x_train1 == x_train2) 机器学习流程
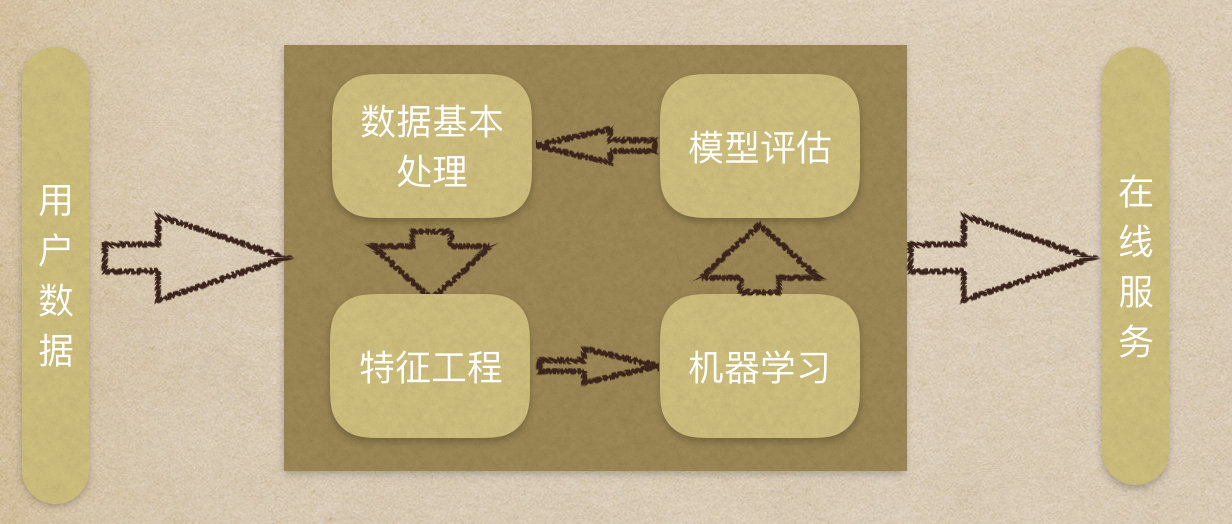
- 获取数据集
- 数据基本处理
- 特征工程
- 机器学习
- 模型评估
鸢尾花预测分析
导入所需模块
from sklearn.datasets import load_iris from sklearn.model_selection import train_test_split from sklearn.preprocessing import StandardScaler from sklearn.neighbors import KNeighborsbClassifier 机器学习流程
- 获取数据集
- 数据基本处理
- 特征工程
- 机器学习
- 模型评估
获取数据
iris = load_iris() iris print("数据集为:\n", iris.data.shape) print("目标集为:\n", iris.target) print("目标集名称为:\n", iris.target_names) print("鸢尾花特征的名字:\n", iris.feature_names) # print("鸢尾花的描述:\n", iris.DESCR) # iris.data.shape 数据集为: (150, 4) 目标集为: [0 0 0 0 0 0 0 0 0 0 0 0 0 0 0 0 0 0 0 0 0 0 0 0 0 0 0 0 0 0 0 0 0 0 0 0 0 0 0 0 0 0 0 0 0 0 0 0 0 0 1 1 1 1 1 1 1 1 1 1 1 1 1 1 1 1 1 1 1 1 1 1 1 1 1 1 1 1 1 1 1 1 1 1 1 1 1 1 1 1 1 1 1 1 1 1 1 1 1 1 2 2 2 2 2 2 2 2 2 2 2 2 2 2 2 2 2 2 2 2 2 2 2 2 2 2 2 2 2 2 2 2 2 2 2 2 2 2 2 2 2 2 2 2 2 2 2 2 2 2] 目标集名称为: ['setosa' 'versicolor' 'virginica'] 鸢尾花特征的名字: ['sepal length (cm)', 'sepal width (cm)', 'petal length (cm)', 'petal width (cm)'] 数据基本处理
# x_train,x_test,y_train,y_test为训练集特征值、测试集特征值、训练集目标值、测试集目标值 x_train, x_test, y_train, y_test = train_test_split(iris.data, iris.target, test_size=0.2, random_state=22) x_train.shape (120, 4) # 测试集占0.2 x_test.shape (30, 4) 特征工程 – 特征预处理
transfer = StandardScaler() x_train = transfer.fit_transform(x_train) x_test = transfer.transform(x_test) 机器学习
实例化评估器
estimator = KNeighborsClassifier() 模型训练
estimator.fit(x_train, y_train) KNeighborsClassifier() 模型评估
预测值结果输出
y_pre = estimator.predict(x_test) print("预测值是:\n", y_pre) print("预测值和真实值的对比是:\n", y_pre == y_test) 预测值是: [0 2 1 2 1 1 1 1 1 0 2 1 2 2 0 2 1 1 1 1 0 2 0 1 2 0 2 2 2 2] 预测值和真实值的对比是: [ True True True True True True True False True True True True True True True True True True False True True True True True True True True True True True] 准确率计算
score = estimator.score(x_test, y_test) print("准确率为:\n", score) 准确率为: 0.33333 2024最新激活全家桶教程,稳定运行到2099年,请移步至置顶文章:https://sigusoft.com/99576.html
版权声明:本文内容由互联网用户自发贡献,该文观点仅代表作者本人。本站仅提供信息存储空间服务,不拥有所有权,不承担相关法律责任。如发现本站有涉嫌侵权/违法违规的内容, 请联系我们举报,一经查实,本站将立刻删除。 文章由激活谷谷主-小谷整理,转载请注明出处:https://sigusoft.com/147783.html


