@LJ
说明
本人初步接触深度学习相关的知识,如果发布的内容有错误的地方,还请大家指正。
正文内容
以下将介绍本人如何使用迁移学习实现鼾声和非鼾声的二分类识别任务。
数据库说明
本研究中一共使用了2个数据库:Snoring Dataset 和 ESC-50 数据库,前者作为训练集数据集,后者的部分数据作为测试集数据。
1.Snoring Dataset
数据来源:https://www.kaggle.com/tareqkhanemu/snoring
数据介绍:该数据库一共包含三个文件,文件“0”代表非鼾声数据(.wav格式),文件“1”代表鼾声数据(.wav格式),而Snoring_dataset.txt文件详细介绍了文件夹“0”和“1”中的数据组成以及音频时长(1s)。
2.ESC-50
数据来源:一时间忘了在哪下载的了,我已经上传到百度云盘,需要的可以由以下链接获取。
【链接:https://sigusoft.com/s/1ISrLlZlZju6GwzRmdBPC6w
提取码:0klg】
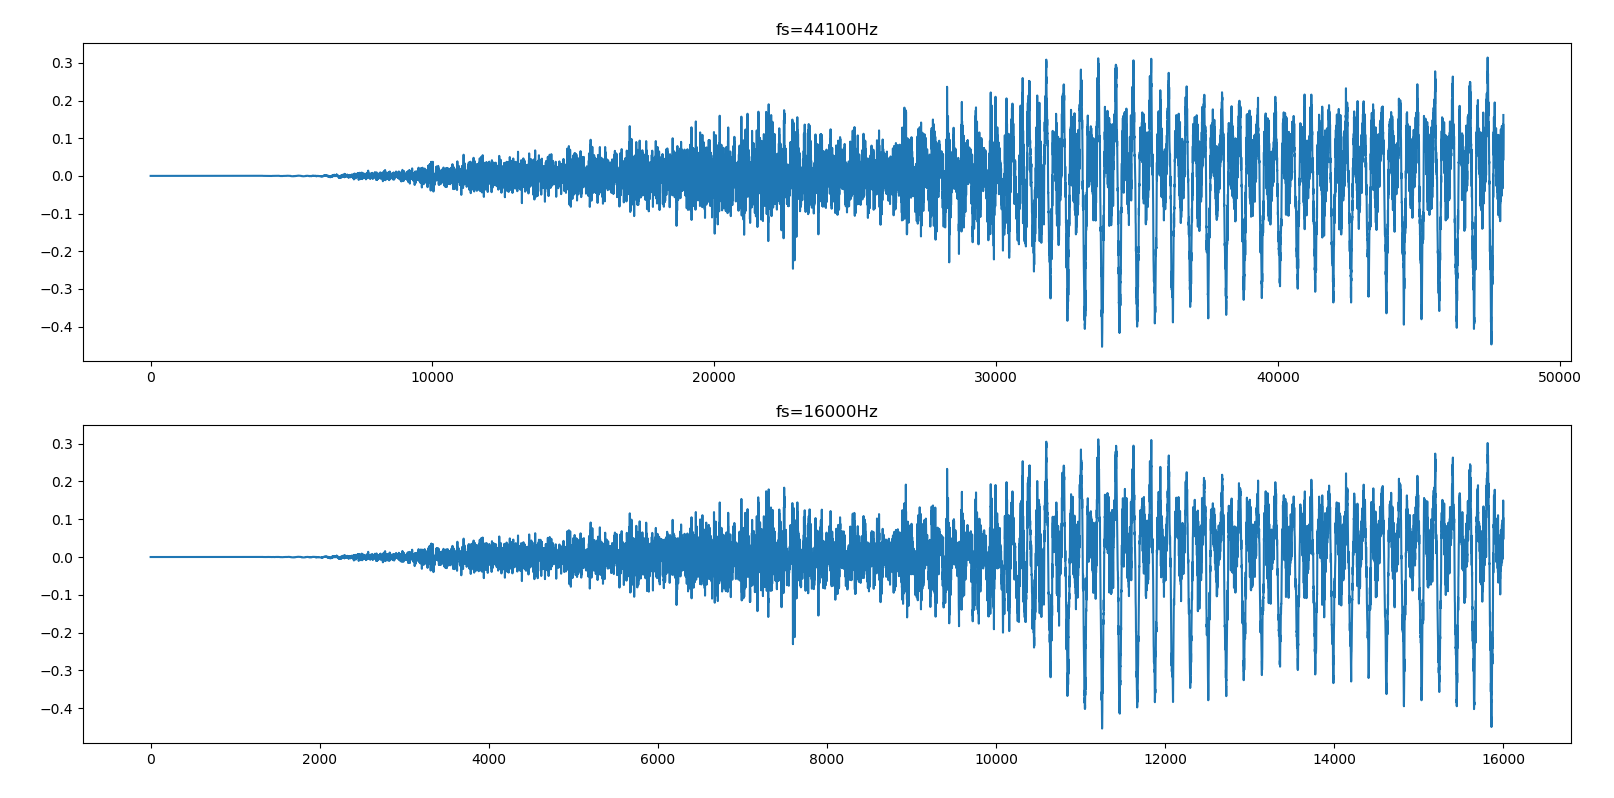
数据介绍:该数据库一共包含6个文件,其中文件夹“ESC-50”包含了50个类别的原始音频数据(.ogg格式),readme.txt文件详细介绍了该数据组成以及数据的采样率(44100 Hz)和音频时长(5s)。
数据分析处理流程
1.读取原始的音频数据
本次实验中涉及到的两种音频格式(.wav和.ogg)的数据均采用python中的soundfile模块进行数据读取,代码如下所示(该代码来源于https://github.com/qiuqiangkong/audioset_classification)
def read_audio(path, target_fs): ''' input:path=原始音频数据的路径;target_fs:目标采样率,如果数据的采样率不是目标采样率则需要进行重采样 output:返回读取的音频信号和采样率 ''' (audio, fs) = soundfile.read(path)#读取音频信号数据和采样率 if audio.ndim > 1: audio = np.mean(audio, axis=1)#如果音频信号是多通道的,就平均 if target_fs is not None and fs != target_fs:#获取音频信号的采样率之后,如果不是所需的采样率,则对其进行重采样 audio = librosa.resample(audio, orig_sr=fs, target_sr=target_fs) fs = target_fs return audio, fs 2.梅尔谱图输出
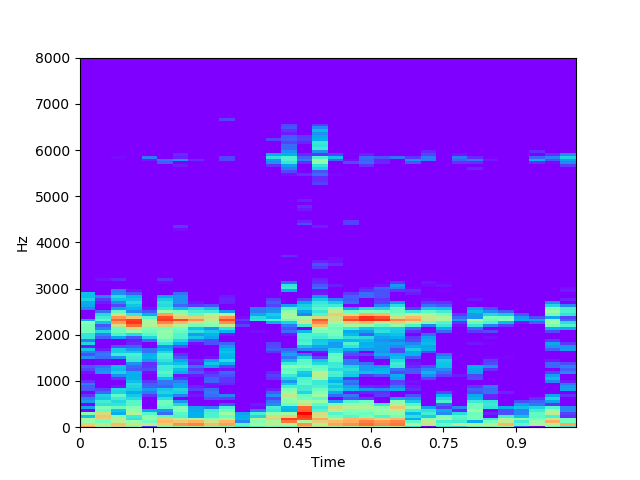
梅尔谱是音频信号的一个重要谱图特征,对于音频信号的识别具有重要的意义,详细的原理及python实现参见以下链接:
https://www.cnblogs.com/LXP-Never/p/10918590.html
本实验中直接使用python自带的librosa模块求取音频信号的梅尔谱特征,代码如下所示。
melspec = librosa.feature.melspectrogram(audio/32768, sr=fs, n_fft=1024, hop_length=512, n_mels=128,power=2)#梅尔谱特征 logmelspec = librosa.power_to_db(melspec)#Log梅尔谱特征 mfcc=librosa.feature.mfcc(audio, fs)#梅尔倒谱系数(本次实验没有使用) plt.figure() librosa.display.specshow(logmelspec, sr=fs, x_axis='time', y_axis='hz') plt.set_cmap('rainbow') plt.savefig('melspec.png') plt.show() 3.输入网络前的图片预处理
由于本次实验使用了已训练好的模型ResNet-50进行迁移学习,所以图片的尺寸以及相关的预处理需与该网络模型的输入一致。
ResNet的论文地址:https://arxiv.org/pdf/1512.03385.pdf
ResNet网络图像的预处理流程详解参见:https://www.sigusoft.com/p/739df
本实验中的代码实现如下所示。
def melspec_processing(melspecpath): ''' input:melspecpath=梅尔谱存储的位置 output:返回224×224×3的数据和标签 ''' filename=os.listdir(melspecpath) imgs=[] labels=[] for file in filename: img=Image.open(melspecpath+file) img = img.convert("RGB") #因为存储的是png格式的图片是4个通道,包含了透明度所以需要转成3通道 #图片的预处理 https://arxiv.org/pdf/1512.03385.pdf #根据短边实现等比例缩放 width=img.size[0] height=img.size[1] rate=256/height img = img.resize((int(width*rate), int(height*rate)), Image.ANTIALIAS) # img=img.resize((256,256),resample=Image.ANTIALIAS) #图片裁剪(Cropping),224×224, #由于mel谱展示了信号在时间上和频率上的变化,很多时候各个音频主要表现在频率上的变化, #所以我们裁剪的时候纵轴保持最中间的部分,横轴也保持最中间的部分 img=img.crop((59,16,283,240)) #归一化(Normalizing),对于训练集数据,每个通道减去每个通道的平均值 img = np.array(img) img[:,:,0]=img[:,:,0]-np.mean(img[:,:,0]) img[:,:,1]=img[:,:,1]-np.mean(img[:,:,1]) img[:,:,2]=img[:,:,2]-np.mean(img[:,:,2]) imgs.append(img) if len(file)==1: if file[0] == '0': labels.append([1,0]) else: labels.append([0,1]) else: if 'Snoring' in file: labels.append([0,1]) else: labels.append([1,0]) x=np.array(imgs) y=np.array(labels) return x, y 4.模型的训练
本实验中模型的训练主要分为两部分,第一部分是导入已有的经典模型,并通过该模型输出特征,其次是构建全连接网络,训练获取全连接网络层的权重参数或最终的模型,并用于后续的测试。部分代码如下所示。
1.导入ResNet-50模型,并输出经过该层得出的特征
def transfer_feature(x): ''' input:x=输入的数据,用于导入模型输出对应的特征 output:返回经已有模型训练得出的特征 ''' m=x.shape[0] Resnet=ResNet50(include_top=False) feature=Resnet.predict(x) x_out=feature.reshape(m,-1) return x_out 2.构建最后的全连接网络层,这里需要设计全连接网络层的神经个数和dropout层的概率
def my_model(num_class): ''' input:num_clsss=分类的类别 output:返回模型 ''' #构建自己的后半段模型 model=tf.keras.Sequential([ tf.keras.layers.Dense(units=512, activation=tf.keras.activations.relu), tf.keras.layers.Dropout(rate=0.8), tf.keras.layers.Dense(units=512, activation=tf.keras.activations.relu), tf.keras.layers.Dropout(rate=0.5), tf.keras.layers.Dense(units=num_class, activation=tf.keras.activations.sigmoid) ]) return model 3.模型的训练,这里会涉及到对训练参数的调试
def train(num_class,x,y,chkpath): ''' input:x=输入的图片集;y=图片的标签;chkpath=最佳参数存储位置以及训练集loss和acc存储路径 output:返回模型,并存储模型,同时将最好的参数进行保存,也可用于后续的预测使用 ''' x_out=transfer_feature(x) model=my_model(num_class) model.compile(optimizer=tf.keras.optimizers.Adam(lr=0.00001,beta_1=0.9, beta_2=0.99, \ epsilon=1e-08, decay=0.0005), loss='binary_crossentropy', metrics=['acc']) history=model.fit(x_out, y, epochs=100, batch_size=16,validation_split=0.2) #展示训练过程的loss和acc acc=history.history['acc'] val_acc=history.history['val_acc'] loss=history.history['loss'] val_loss=history.history['val_loss'] epochs=range(1,len(acc)+1) plt.plot(epochs,acc,'b',label='Training accuracy') plt.plot(epochs,val_acc,'r',label='Validation accuracy') plt.title('Training and validation accuracy') plt.xlabel("Epochs") plt.ylabel('Accuracy') plt.legend() plt.savefig(chkpath+'accury.png') plt.close() plt.figure() plt.plot(epochs,loss,'b',label='Training loss') plt.plot(epochs,val_loss,'r',label='Validation loss') plt.title('Training and validation loss') plt.xlabel("Epochs") plt.ylabel('Value of loss function') plt.legend() plt.savefig(chkpath+'loss.png') plt.close() model.save(chkpath+"my_model.h5") return model 5.模型的预测和评估
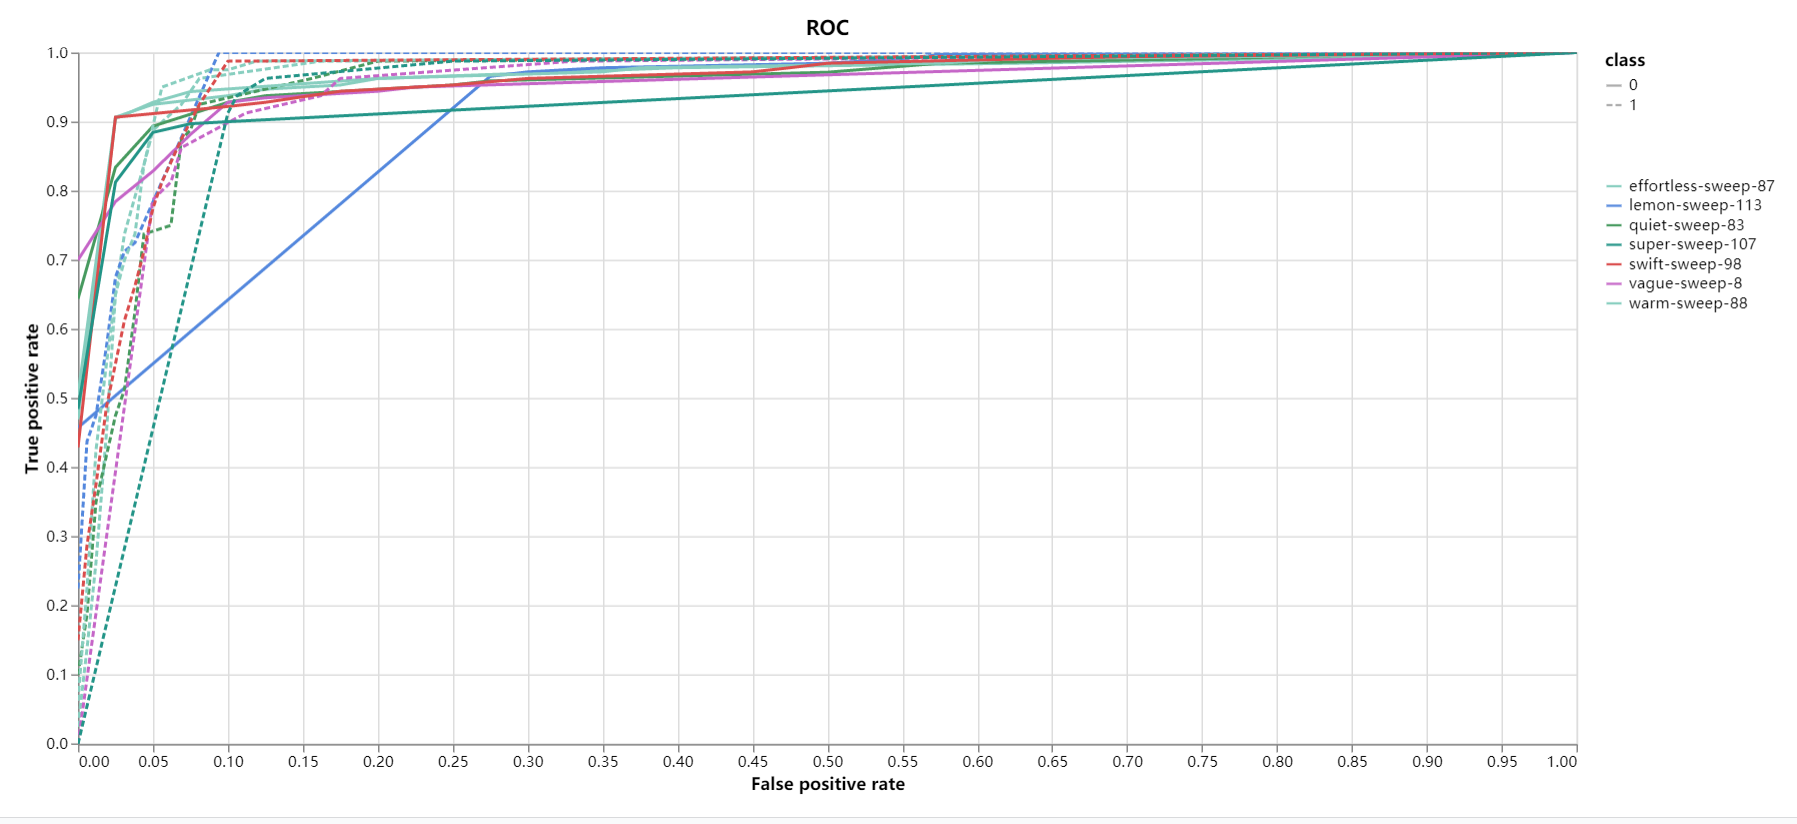
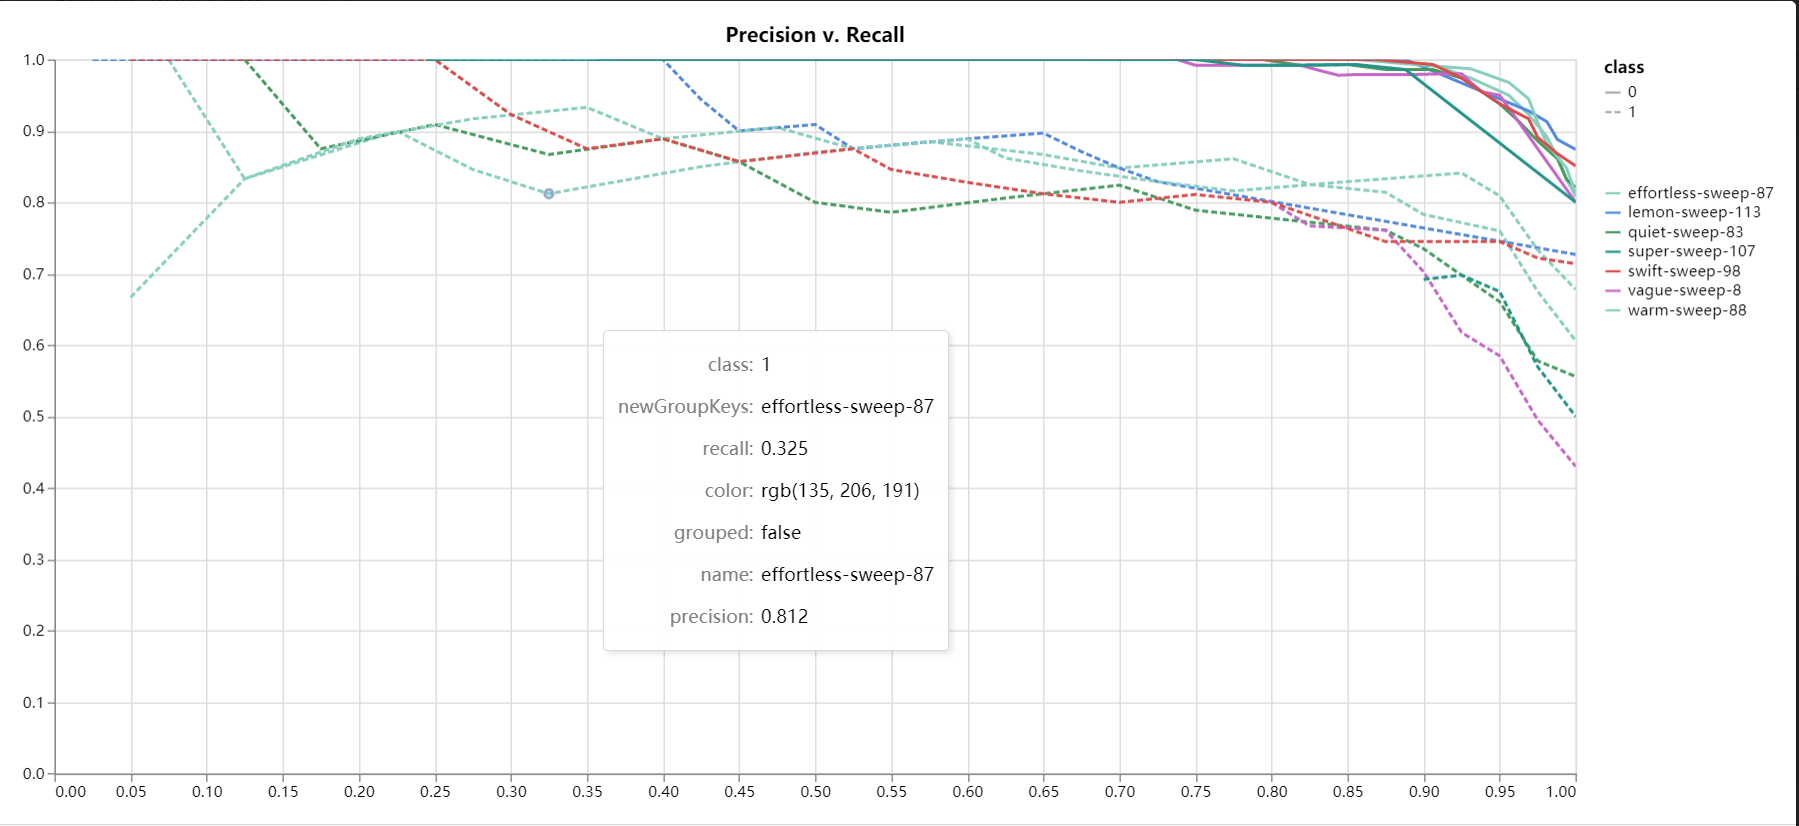
本次模型的测试采用了ESC-50的部分数据,并使用常见的二分类指标对模型进行评估,此处不再赘述,实验结果如下。
完整代码
完整代码如下所示。
import wandb import warnings warnings.filterwarnings('ignore') import pandas as pd import numpy as np import tensorflow as tf import os import soundfile import librosa import librosa.display import tqdm import matplotlib.pyplot as plt from time import sleep from PIL import Image from one_hot import onehot_code from tensorflow.python.keras.models import load_model from tensorflow.python.keras.applications.resnet import ResNet50 from tensorflow.python.keras import callbacks from sklearn.metrics import roc_auc_score, f1_score, \ precision_score, recall_score, average_precision_score #=========超参数监控说明=========================== wandb.init(project='TFL',entity='ljhahaha') wandb.config.lr=0.0001 wandb.config.decay=0.0005 wandb.config.hidden_layer1=512 wandb.config.hidden_layer2=512 wandb.config.hidden_layer3=512 wandb.config.dropout1=0.5 wandb.config.dropout2=0.5 wandb.config.dropout3=0.5 wandb.config.batch_size=32 wandb.config.epochs=30 #===========读取数据========================== def read_audio(path, target_fs): ''' input:path=原始音频数据的路径;target_fs=目标采样率,如果数据的采样率不是目标采样率则需要进行重采样 output:返回读取的音频信号和采样率 ''' (audio, fs) = soundfile.read(path)#读取音频信号数据和采样率 if audio.ndim > 1: audio = np.mean(audio, axis=1)#如果音频信号是多通道的,就平均 if target_fs is not None and fs != target_fs:#获取音频信号的采样率之后,如果不是所需的采样率,则对其进行重采样 audio = librosa.resample(audio, orig_sr=fs, target_sr=target_fs) fs = target_fs return audio, fs #======mel谱提取=================================== def melspec(path,target_fs,savepath): ''' input:path=音频文件存储路径;savepath=梅尔谱存储的路径 output:返回梅尔谱图 ''' filelist=os.listdir(path) for elem in filelist: filename=os.listdir(path+elem+'/') for i in range(0,len(filename)):#len(filename) #=======获取音频信号及其特征提取============ audio,fs=read_audio(path+elem+'/'+filename[i], target_fs) #利用python自带函数获取mel频谱图和mfcc#audio/32768 melspec = librosa.feature.melspectrogram(audio/32768, sr=fs, n_fft=1024, hop_length=512, n_mels=128,power=2) logmelspec = librosa.power_to_db(melspec) mfcc=librosa.feature.mfcc(audio, fs) #定义的函数获取mel频谱图和mfcc # mfcc1, melspec1,freq=extract_audioset_mel(audio,fs) plt.figure() librosa.display.specshow(logmelspec, sr=fs, x_axis='time', y_axis='hz') plt.set_cmap('rainbow') plt.savefig(savepath+elem+str(i)+'.png')#elem=0就是非鼾声,1就是鼾声 # plt.show() plt.close() return None #====图片的预处理和标签制作===================== def melspec_processing(melspecpath): ''' input:melspecpath=梅尔谱存储的位置 output:返回224×224×3的数据和标签 ''' filename=os.listdir(melspecpath) imgs=[] labels=[] for file in filename: img=Image.open(melspecpath+file) img = img.convert("RGB") #因为存储的是png格式的图片是4个通道,包含了透明度所以需要转成3通道 #图片的预处理 https://arxiv.org/pdf/1512.03385.pdf #根据短边实现等比例缩放 width=img.size[0] height=img.size[1] rate=256/height img = img.resize((int(width*rate), int(height*rate)), Image.ANTIALIAS) # img=img.resize((256,256),resample=Image.ANTIALIAS) #图片裁剪(Cropping),224×224, #由于mel谱展示了信号在时间上和频率上的变化,很多时候各个音频主要表现在频率上的变化, #所以我们裁剪的时候纵轴保持最中间的部分,横轴也保持最中间的部分 img=img.crop((59,32,283,256)) #归一化(Normalizing),对于训练集数据,每个通道减去每个通道的平均值 img = np.array(img) img[:,:,0]=img[:,:,0]-np.mean(img[:,:,0]) img[:,:,1]=img[:,:,1]-np.mean(img[:,:,1]) img[:,:,2]=img[:,:,2]-np.mean(img[:,:,2]) imgs.append(img) if file[:-4].isdigit()==True: if file[0] == '0': labels.append([1,0]) else: labels.append([0,1]) else: if 'Snoring' in file: labels.append([0,1]) else: labels.append([1,0]) x=np.array(imgs) y=np.array(labels) return x, y #====导入迁移模型并构建新模型=========================== def transfer_feature(x): ''' input:x=输入的数据,用于导入模型输出对应的特征 output:返回经已有模型训练得出的特征 ''' m=x.shape[0] Resnet=ResNet50(include_top=False) feature=Resnet.predict(x) x_out=feature.reshape(m,-1) return x_out #===构建自己的后半段模型================================ def my_model(num_class): ''' input:num_clsss=分类的类别 output:返回模型 ''' #构建自己的后半段模型 model=tf.keras.Sequential([ tf.keras.layers.Dense(units=wandb.config.hidden_layer1, activation=tf.keras.activations.relu), tf.keras.layers.Dropout(rate=wandb.config.dropout1), tf.keras.layers.Dense(units=wandb.config.hidden_layer2, activation=tf.keras.activations.relu), tf.keras.layers.Dropout(rate=wandb.config.dropout2),#0.2,0.5,0.5 # layer 8 tf.keras.layers.Dense(units=wandb.config.hidden_layer3, activation=tf.keras.activations.relu), tf.keras.layers.Dropout(rate=wandb.config.dropout3), tf.keras.layers.Dense(units=num_class, activation=tf.keras.activations.sigmoid) ]) return model #=======训练模型========================== def train(num_class,x,y,chkpath): ''' input:x=输入的图片集;y=图片的标签;chkpath=最佳参数存储位置以及训练集loss和acc存储路径 output:返回模型,并存储模型,同时将最好的参数进行保存,也可用于后续的预测使用 ''' x_out=transfer_feature(x) model=my_model(num_class) # wandb.watch(model) model.compile(optimizer=tf.keras.optimizers.Adam(lr=wandb.config.lr,decay=wandb.config.decay), loss='binary_crossentropy', metrics=['acc']) history=model.fit(x_out, y, epochs=wandb.config.epochs, batch_size=wandb.config.batch_size,validation_split=0.25) #展示训练过程的loss和acc acc=history.history['acc'] val_acc=history.history['val_acc'] loss=history.history['loss'] val_loss=history.history['val_loss'] epochs=range(1,len(acc)+1) plt.plot(epochs,acc,'b',label='Training accuracy') plt.plot(epochs,val_acc,'r',label='Validation accuracy') plt.title('Training and validation accuracy') plt.xlabel("Epochs") plt.ylabel('Accuracy') plt.legend() plt.savefig(chkpath+'accury.png') plt.close() plt.figure() plt.plot(epochs,loss,'b',label='Training loss') plt.plot(epochs,val_loss,'r',label='Validation loss') plt.title('Training and validation loss') plt.xlabel("Epochs") plt.ylabel('Value of loss function') plt.legend() plt.savefig(chkpath+'loss.png') plt.close() wandb.log({ "Train Accuracy":acc, "Train Loss":loss, "Test Accuracy":val_acc, "Test Loss":val_loss}) #在wandb里面展示数据 wandb.log({"loss" : wandb.plot.line_series( xs=epochs, ys=[loss, val_loss], keys=["Loss of training", "Loss of validation"], title="Loss function", xname="epochs")}) wandb.log({"acc" : wandb.plot.line_series( xs=epochs, ys=[acc, val_acc], keys=["Accuracy of training", "Accuracy of validation"], title="Accuracy", xname="epochs")}) model.save(os.path.join(wandb.run.dir, "my_model.h5")) return model #=====评估和预测========================= def predict(modelpath, modelname,x): ''' input:modelpath=模型存储的位置;modelname=模型的名称;x=输入的特征 output:返回预测值 ''' #使用模型进行预测 model=load_model(modelpath+modelname) #使用最佳参数进行预测 y_pred=model.predict(x) return y_pred #====正式训练================================ print('--------------Transfer learning begin------------------------------') #定义常量 train_wave='E:/data/Snoring Dataset/' train_mel_save='E:/transfer_learning/train_Snoringdata/melspectrogram/' test_wave='E:/data/ESC-50/ESC_SUBSET/' test_mel_save='E:/transfer_learning/val_ESC/melspectrogram/' chkpath='E:/transfer_learning/chk/' target_fs=16000 num_class=2 print('-------Extract melspectrogram feature of train and test set---------') #提取训练集和测试集的梅尔谱 melspec(train_wave,target_fs,train_mel_save) melspec(test_wave,target_fs,test_mel_save) print('-----Preprocessing of melspectrogram of training and testing-----') #训练集和测试集图片预处理 x_train,y_train=melspec_processing(train_mel_save) x_test,y_test=melspec_processing(test_mel_save) print('------Dataset shuffle of training--------------') index = [i for i in range(len(y_train))] np.random.shuffle(index) x_train= x_train[index] y_train = y_train[index] print('-------model train and predict------------------------') model=train(num_class,x_train,y_train,chkpath) x_temp=transfer_feature(x_test) y_prob=model.predict(x_temp) print('----------evaluate------------------------------') y_test=[np.argmax(elem) for elem in y_test] y_pred=[np.argmax(elem) for elem in y_prob] print('AUC=%0.4f'%roc_auc_score(y_test,y_pred)) print('F1 score=%0.4f'%f1_score(y_test,y_pred)) print('Precision=%0.4f'%precision_score(y_test,y_pred)) print('Recall=%0.4f'%recall_score(y_test,y_pred)) wandb.log({ "roc_auc_score":roc_auc_score(y_test,y_pred), "F1 score":f1_score(y_test,y_pred), "Precision":precision_score(y_test,y_pred), "Recall":recall_score(y_test,y_pred)}) wandb.log({"pr": wandb.plot.pr_curve(y_test, y_prob)}) wandb.log({"roc": wandb.plot.roc_curve(y_test, y_prob)}) pass 文中使用了weights & biases(即文中的wandb模块)进行深度学习的超参数寻优及可视化,此处不再赘述,后面会专门写一个博客进行使用方法的说明
链接:https://blog.csdn.net/LJ/article/details/
2024最新激活全家桶教程,稳定运行到2099年,请移步至置顶文章:https://sigusoft.com/99576.html
版权声明:本文内容由互联网用户自发贡献,该文观点仅代表作者本人。本站仅提供信息存储空间服务,不拥有所有权,不承担相关法律责任。如发现本站有涉嫌侵权/违法违规的内容, 请联系我们举报,一经查实,本站将立刻删除。 文章由激活谷谷主-小谷整理,转载请注明出处:https://sigusoft.com/151155.html

