安装双系统win10+Ubuntu20.04LTS(详细到我自己都害怕)
写在前面
写这篇文章的起因是因为重装了很多次电脑了,每次重装都要找各种零零散散的博客,有些博客写的是错的,有些还药不对症。
痛,太痛了。
痛苦得我决定自己写一篇大一统的Ubuntu系统配置指南。
现在基本都写完了,还有些零散的内容待补全。感兴趣的可以收藏,写这东西是真的给我累坏了。
本文包括以下内容
- (一)安装双系统。
- (二)Ubuntu系统初始设置。
- (三)相关软件生态安装。
- (四)深度学习环境配置。
- (五)桌面美化。
(一)安装双系统
1.如果已经安装Win+Ubuntu双系统,但是想重装Ubuntu,请看这里
右键“此电脑”进入管理。
点击左侧“磁盘管理”。
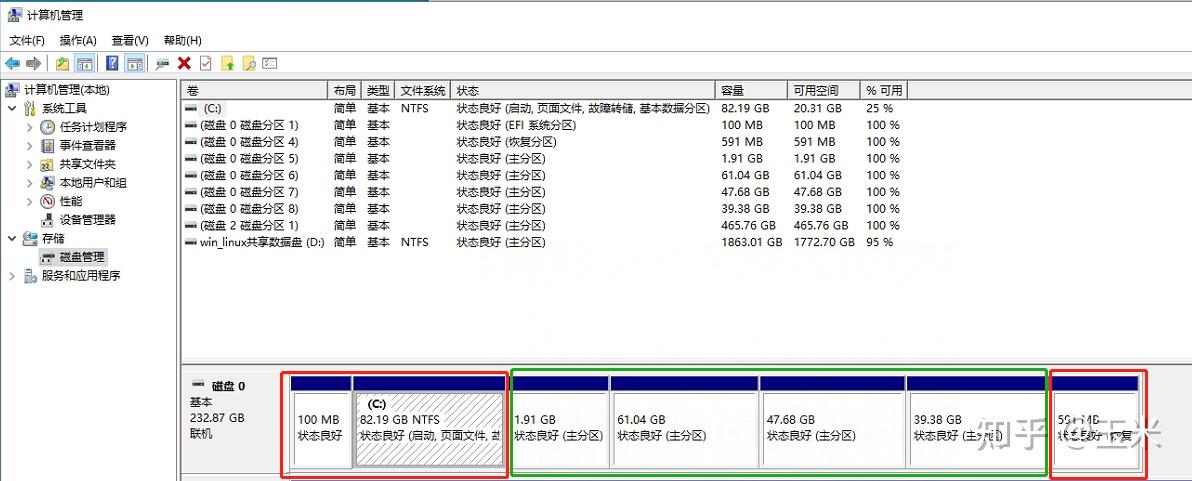


此前我使用一块独立的固态盘安装了双系统。
其中红色区域为Windows的系统分区,绿色区域为Ubuntu的系统分区。
将绿色区域的分区全部删除(请提前做好重要数据备份)。
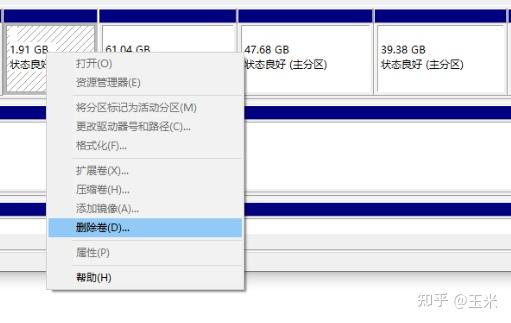


删除后得到给ubuntu系统预留的150GB干净空间。


打开“DiskGenius”软件。


进入ESP分区,将EFI目录中的“ubuntu”文件删除,以完成真正的卸载。
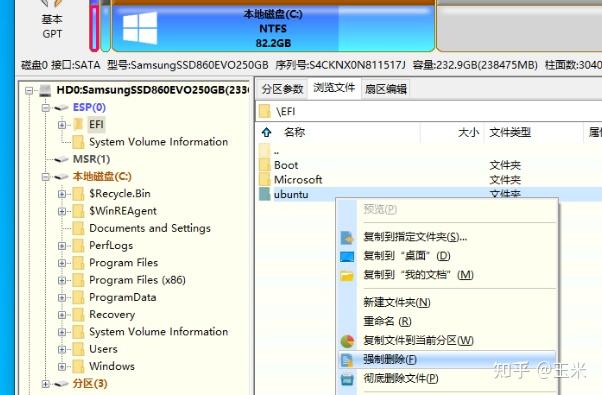


重启电脑,如果可以直接进入Window系统,则Ubuntu系统已经彻底卸载。
2.如果只有纯Win系统,想要安装Ubuntu双系统,请看这里
右键“此电脑”进入管理,点击左侧栏中的“磁盘管理”。


假设需要将windows和ubuntu装在同一块系统盘中,需要对目前的windows系统主分区进行分割。
右键点击“压缩卷”。
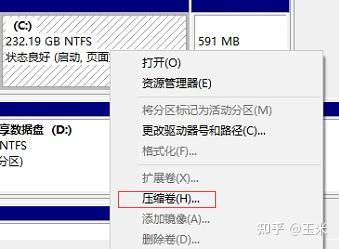


假设给ubuntu分配150GB的空间,则在以下位置填入150*1024=153600MB。
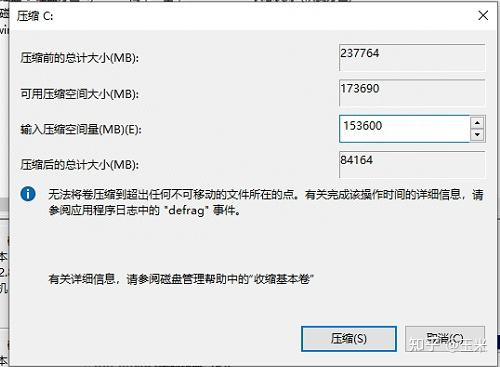


此时可以获得150GB的干净未分配空间。


3.制作系统盘
准备一块闲置的U盘并插入电脑,打开软件“UltraSO”,点击“文件”->“打开”,


选择要安装ubuntu镜像。


点击“启动”->“写入硬盘映像”。
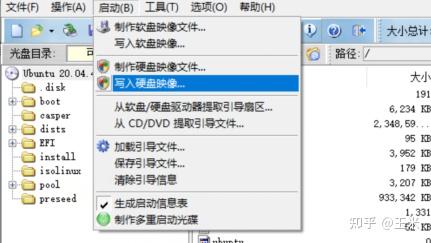


选择对应的硬盘驱动器后,点击“写入”。
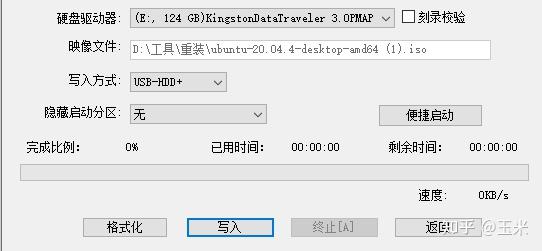


等待启动盘制作完成后,重启主机。
4.安装Ubuntu系统
启动主机,进入系统前按住“F12”进入bios设置(请自行按照不同厂商提供的方式进入bios)
将“UEFI”前缀开头的引导分区放到最前。(请注意区分红框和绿框,不要混淆)
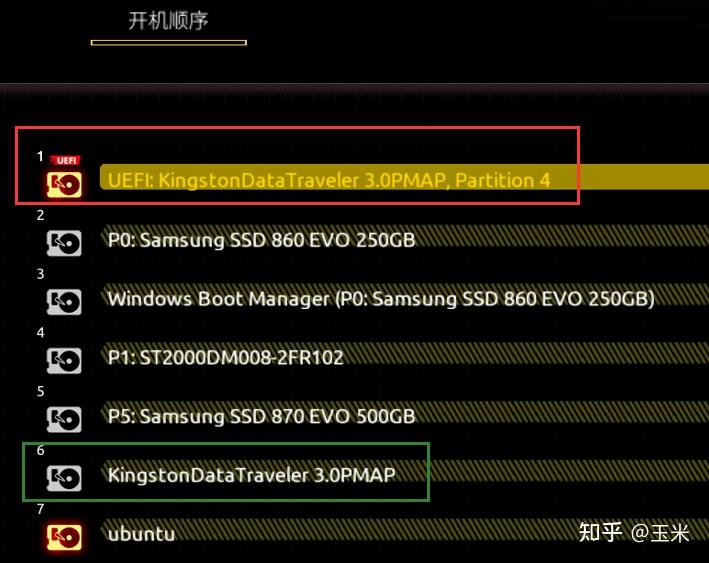


保存设置后退出bios,重启主机,此时应该顺利进入ubuntu的安装程序。
请根据喜好自行选择语言。


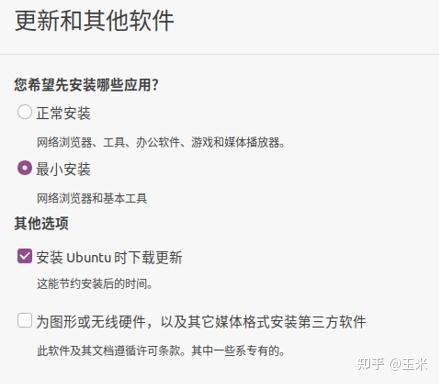
选择最小安装,办公软件有更好的选择,在第(三)部分中会详细讲解。
选择在安装Ubuntu时下载更新。


选择其他选项,自行分配Ubuntu的系统分区会更合理。
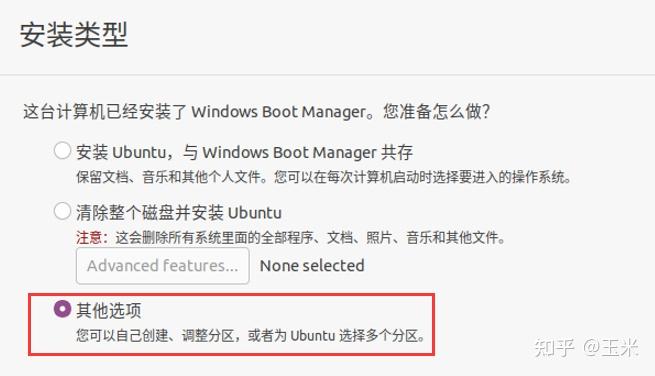


找到上文中在windows系统分配的150GB空间。点击左下角“+”号进行分区设置。


新建boot引导分区,大小为2GB = 2*1024MB = 2048MB。设置为主分区,文件系统选择“Ext4”。


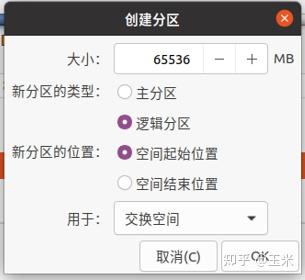
新建交换分区,大小一般为主机内存1-2倍,由于本机内存为64GB,所以设置分区大小为64GB=65536MB。
分区类型选择“逻辑分区”,文件系统选择“交换空间”。


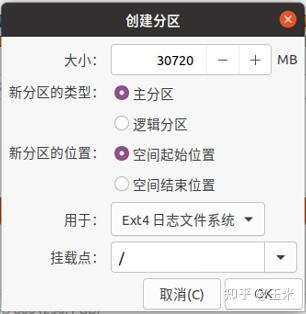
新建主分区(相当于windows的C盘),存储Ubuntu的主要系统文件,大小一般为20-30GB,本文设置为30GB=30720MB,分区类型选择主分区,文件系统选择“Ext4”,挂载点选择“/”。


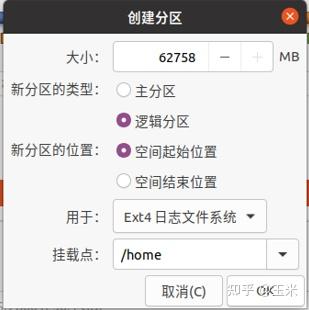
新建数据分区(相当于Windows的数据盘),容量大小为150GB分配后剩余的空间。分区类型选择逻辑分区,文件系统选择“Ext4”,挂载点选择“/home”。


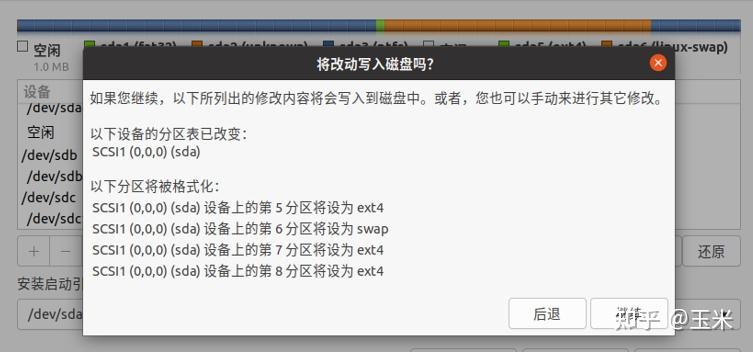
点击右下角“现在安装”,确认分区无误后,点击“继续”。


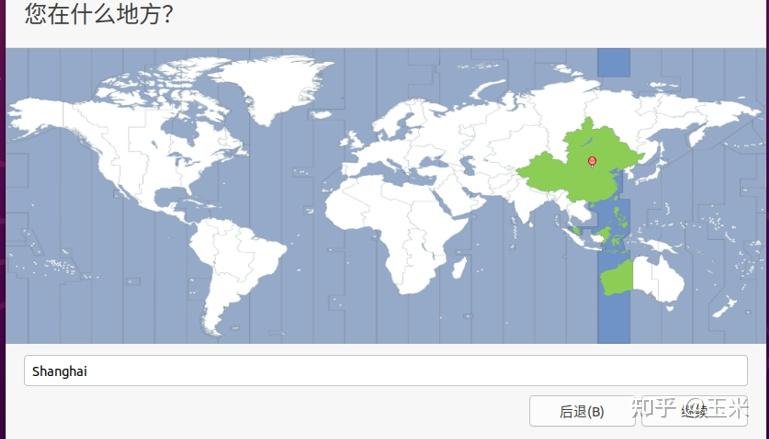
根据你的目前所在地选择时区,点击“继续”。


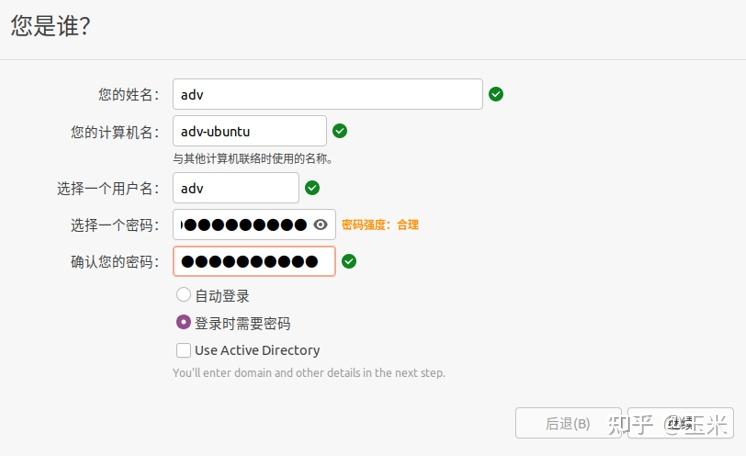
设置Ubuntu账户名,主机名,登陆密码(也是root密码)。建议选择“登陆时需要密码”,如果选择“自动登陆”,后续在系统中打开软件会一直提示“设置密码环”,很烦。


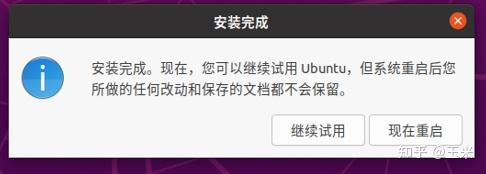
等待安装完毕,点击“现在重启”。


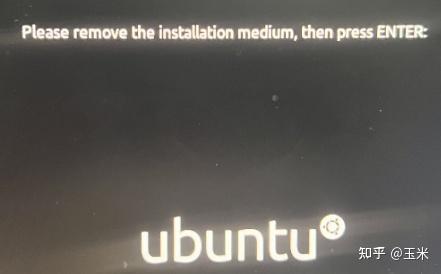
根据提示拔掉U盘,按下“Enter”键。


此时(或再次重启后)应该进入如下界面,可以选择进入Ubuntu系统(红框)或Windows系统(蓝框)。


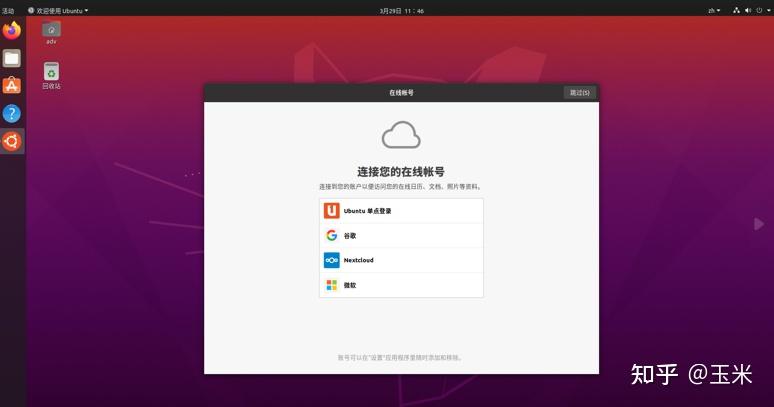
进入系统后可以看到如下界面,至此,Ubuntu系统安装完成。


(二)Ubuntu系统初始设置。
本章介绍安装Ubuntu后的初始配置。
1.安装Ubuntu软件更新
点击桌面左下角的“开始”按钮,找到软件更新器(理论上该界面会自动弹出)。点击“立即安装”。
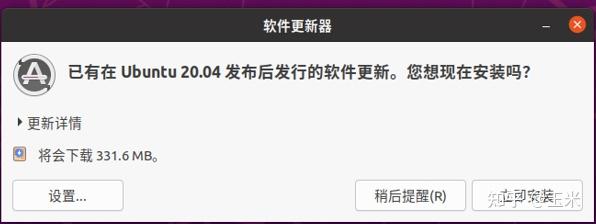


等待软件更新安装完成。
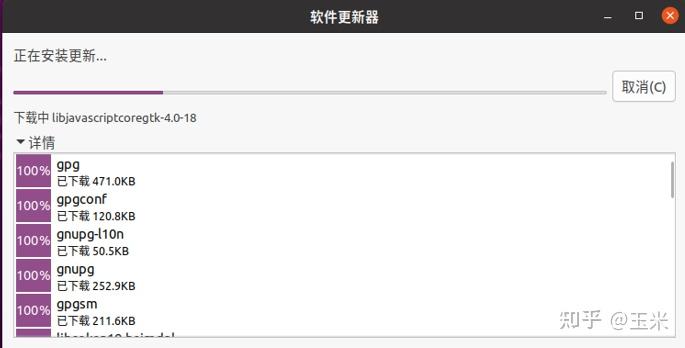


自行选择是否重启以完成软件更新。


2.设置英文目录路径
由于在安装Ubuntu时选择的语言为中文,导致相关常用目录变为中文名,在命令行进行路径切换时会多有不便。因此需要将这些目录改为英文名。
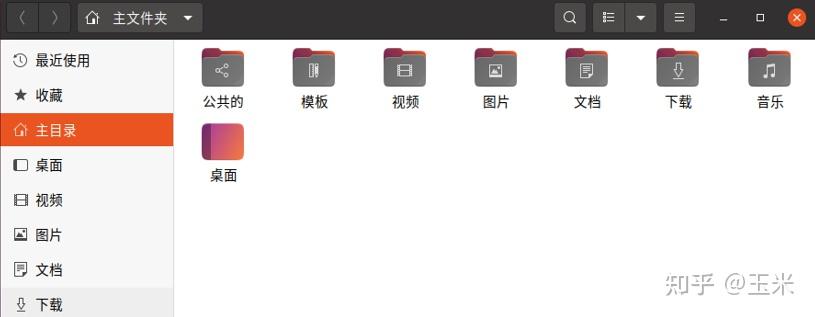


点击左下角“开始”按钮,找到“系统设置”并进入。
找到左侧栏“区域与语言”点击右侧“语言”栏,选择“英语”。
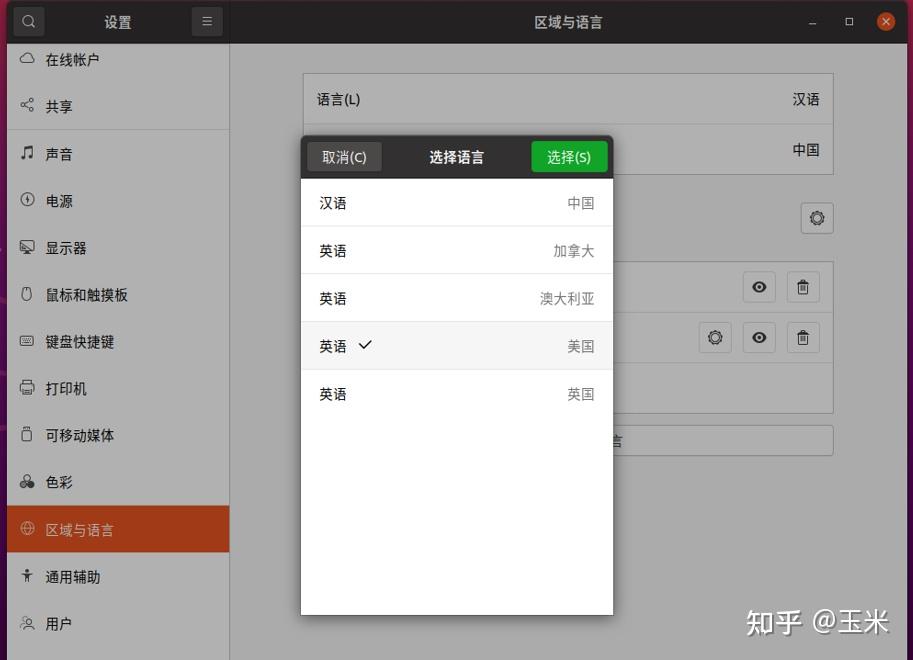


点击“Language”栏下的“Restart”按钮后注销当前用户。(并不需要关机)
输入密码重新进入系统,此时会弹出提示。点击“Update Names”按钮。
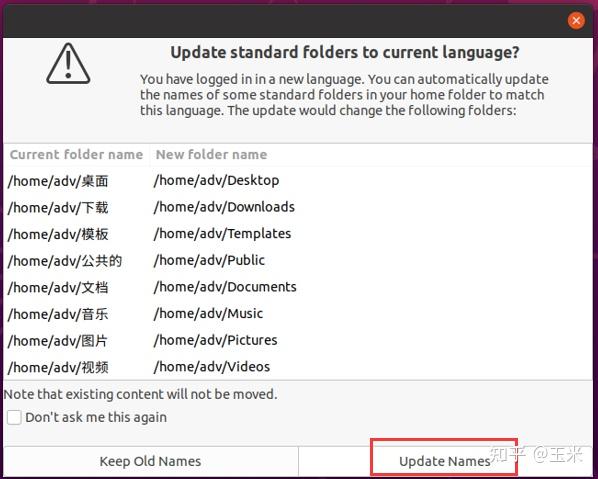


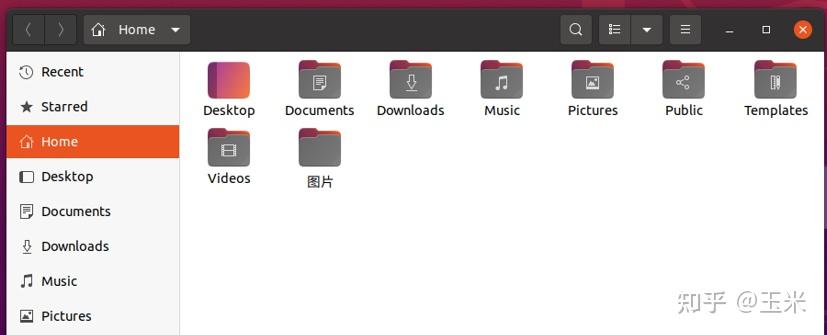
此时相关目录名称已经变更。(实际上是删除原中文名目录再新建英文名目录,如果中文名称的目录中有文件,则会被保留下来,如“图片”和“Pictures”)


再次进入“Region & Language”设置。将“Language”改为“Chinese”。
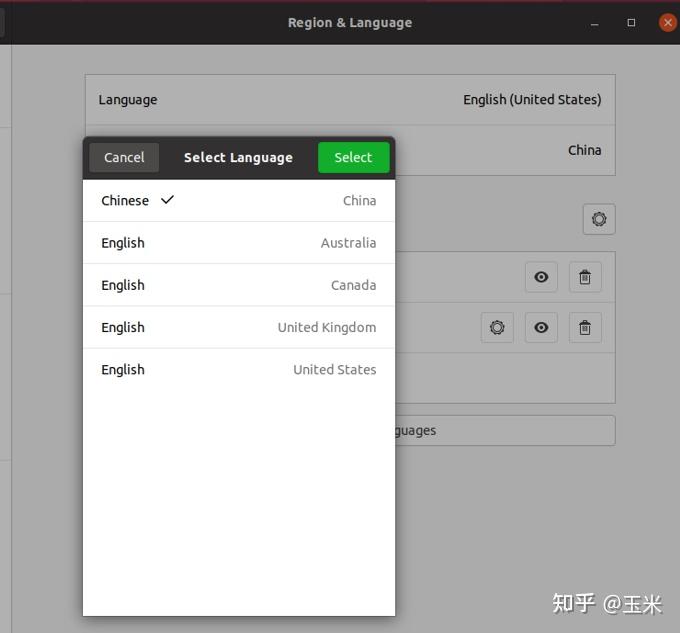


点击“语言”栏下的“重启…”按钮后注销当前用户。(并不需要关机)
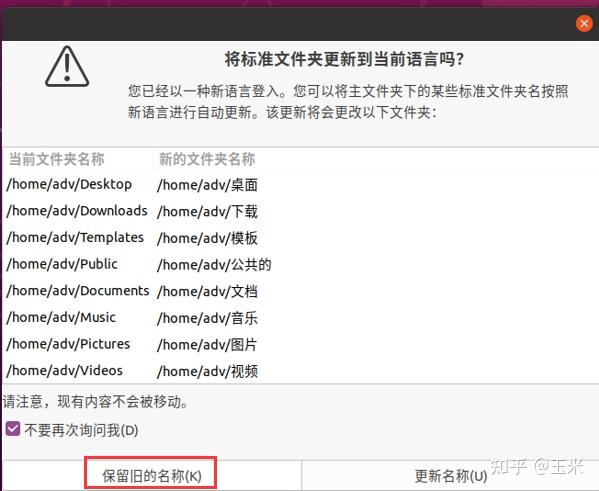
输入密码重新进入系统,此时会弹出提示。选择“不要再次询问我”并点击“保留旧的名称”按钮。


此时,可以看到在中文系统下相关目录已经变更为英文。
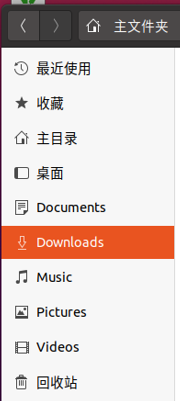


对于其中的“桌面”等只是图形化界面的“外显”。实际上命令行中真正路径名为“Desktop”。


3.更换国内软件源
由于Ubuntu的软件源服务器在境外,因此下载速度会很慢,需要更改软件源为国内镜像网站。
进入/ect/apt路径,找到软件源配置文件“sources.list”


先将源文件做个备份。输入命令:
sudo cp sources.list sources.list.backup


使用Ubuntu自带的编辑器对“sources.list”进行修改,熟悉vi、vim的同学可以使用vi、vim命令进行编辑。
sudo gedit sources.list


将源文件清空并替换为下列源地址。(本文不推荐清华源和阿里源,推荐中科大源)
deb https://mirrors.ustc.edu.cn/ubuntu/ focal main restricted universe multiverse
deb https://mirrors.ustc.edu.cn/ubuntu/ focal-updates main restricted universe multiverse
deb https://mirrors.ustc.edu.cn/ubuntu/ focal-backports main restricted universe multiverse
deb https://mirrors.ustc.edu.cn/ubuntu/ focal-security main restricted universe multiverse

# deb-src https://mirrors.ustc.edu.cn/ubuntu/ focal main restricted universe multiverse
# deb-src https://mirrors.ustc.edu.cn/ubuntu/ focal-updates main restricted universe multiverse
# deb-src https://mirrors.ustc.edu.cn/ubuntu/ focal-backports main restricted universe multiverse
# deb-src https://mirrors.ustc.edu.cn/ubuntu/ focal-security main restricted universe multiverse

## Pre-released source, not recommended.
# deb https://mirrors.ustc.edu.cn/ubuntu/ focal-proposed main restricted universe multiverse
# deb-src https://mirrors.ustc.edu.cn/ubuntu/ focal-proposed main restricted universe multiverse
点击“保存”按钮或者“ctrl+s”后退出,vi、vim输入“:wq”后退出
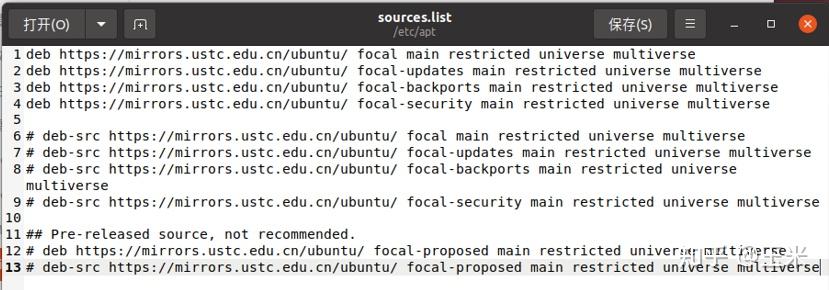


此时软件源更新完成。
4.设置apt包管理工具。
apt是Ubuntu上的软件包管理器,可以通过apt的相关命令进行软件的更新、卸载、故障排除等。更换国内软件源后需要对apt进行更新。
首先更新apt软件包的源。输入命令:
sudo apt updateP.S:有的博客可能会用“sudo apt-get update”命令,实际上apt命令是对apt-get的封装,底层调用机制是一样的,且目前更加推荐“apt”。
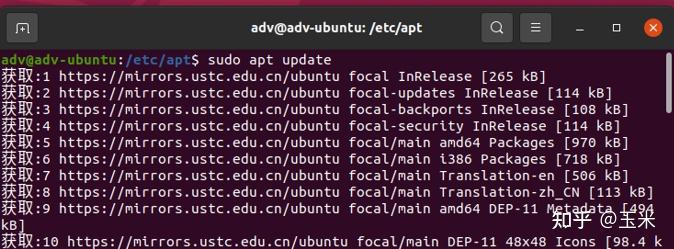


更新完apt的源后,进行相关软件包的升级。输入命令:
sudo apt upgrade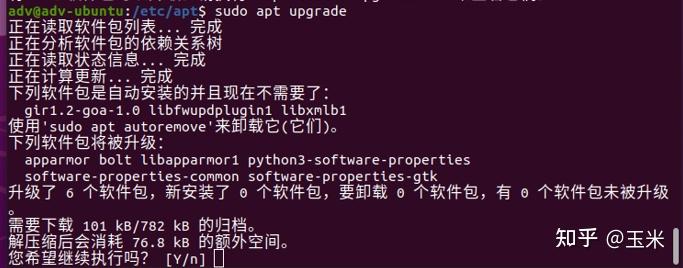


此时,apt包管理工具设置完成。
5.挂载硬盘
首先,通过“lsblk”命令查看目前Ubuntu中的磁盘情况。
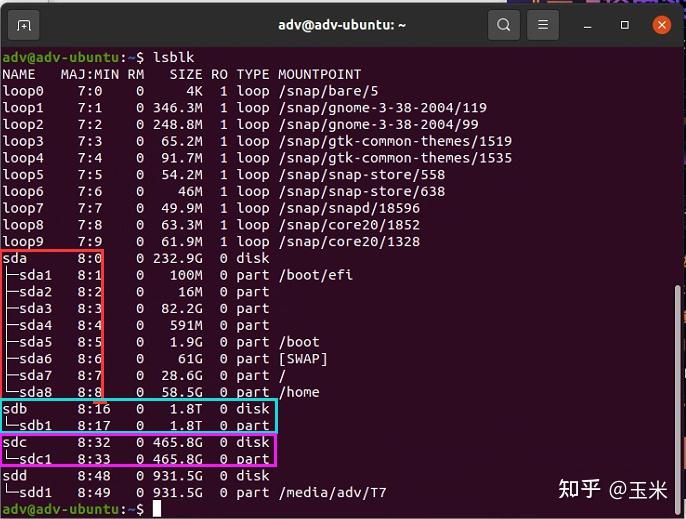


其中红框是系统盘,安装了Windows系统和Ubuntu系统。此外主机中还有一块500GB的固态(紫框)和2TB的机械硬盘(蓝框)。准备将固态盘做成主数据盘,机械硬盘做成Windows和Ubuntu的共享盘。
如果是全新的磁盘,需要将进行分区并设置文件系统,固态盘使用“ext4”文件系统。共享盘使用“ntfs”文件系统。(Windows识别不了“Ext”文件系统的磁盘。但但Ubuntu可以识别“ntfs”文件系统的磁盘。)
由于之前已经分好区了,所以直接挂载对应的分区“sdb1”和“sdc1”即可。
输入“lsblk -f”命令可以当前分区的UUID


在/mnt目录下分别创建挂载的目录
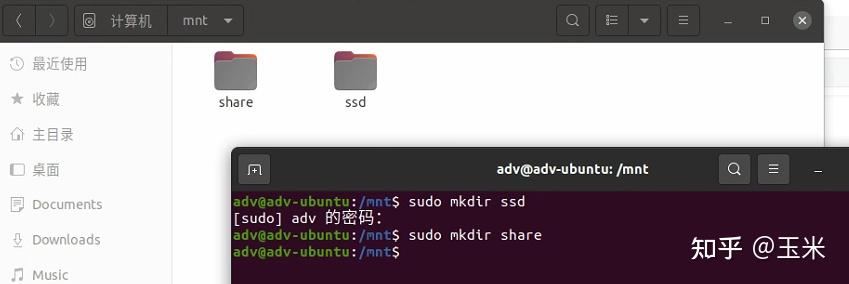


输入命令,用编辑器打开“fstab文件”:
sudo gedit /etc/fstab将下列代码添加至“fstab”文件末尾,注意修改代码中的“UUID”,“挂载目录”和“文件系统”。
# ssd data disk
UUID=fd431d08-2bc8-4af3-be33-41910ad9082d /mnt/ssd        ext4    defaults        0       0
# share disk
UUID=765652DD56529E25                    /mnt/share       ntfs    defaults        0       0


保存并退出文件编辑,输入命令,进行全局挂载。
sudo mount -a此时已经可以通过挂载目录访问两个磁盘的内容。将挂载目录加入到快捷访问栏便于日后访问。


6.配置局域网ssh连接
使用以下命令安装一下Ubuntu的网络工具包
sudo apt install net-tools使用“ifconfig”命令查看一下ipv4的地址(红框)。


在局域网的另一台电脑下尝试可否ping通该ip地址。
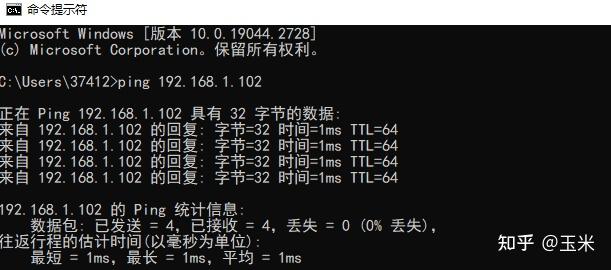


如果出现上述结果则说明可以连接。
接下来在Ubuntu上启用SSH。
Secure Shell (SSH) 是一个网络协议,它主要被用来加密客户端和服务端之间的连接。 从而建立一条安全的交互通道。
使用以下命令安装ssh工具:
sudo apt install openssh-server接下来修改一下ssh的系统配置,输入以下命令,用编辑器打开配置文件。
sudo gedit /etc/ssh/sshd_config //注意不要和ssh_config文件搞混了修改四个位置。
将“Port 22”一行解除注释,可以自定义端口号,这里直接用默认的“22”端口号。
将“ListenAddress 0.0.0.0”一行解除注释。
将“PermitRootLogin prohibit-password”一行解除注释并将“prohibit-password”修改为“yes”。
将“PasswordAuthentication yes”一行解除注释。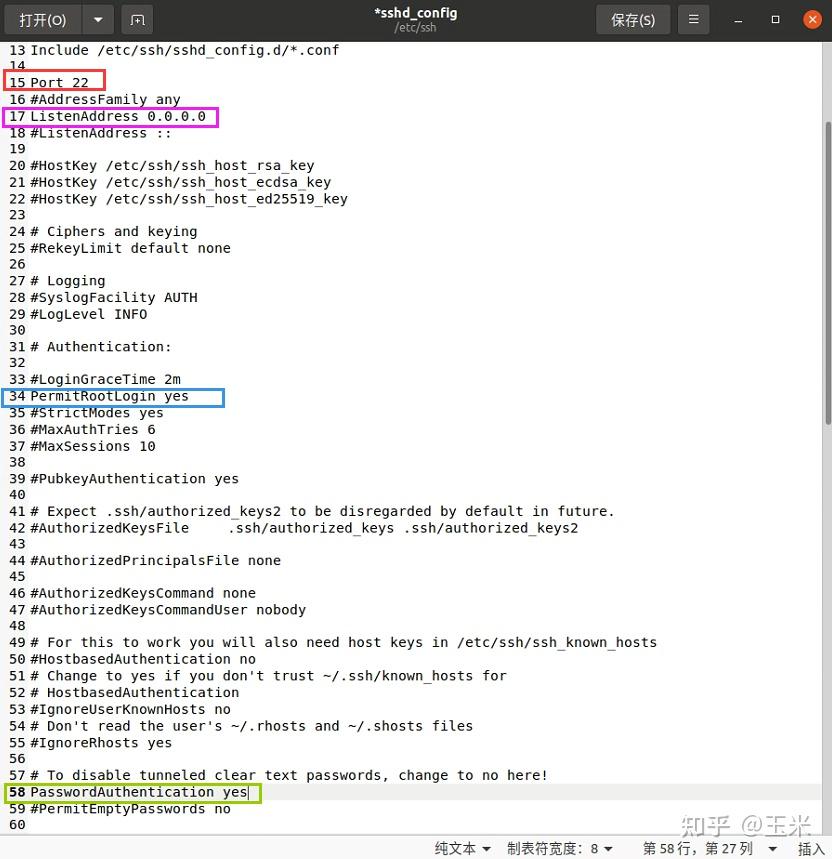


打开ssh服务。
sudo service ssh start 或 systemctl start ssh查看目前ssh的服务状态
sudo service ssh status 或 systemctl status ssh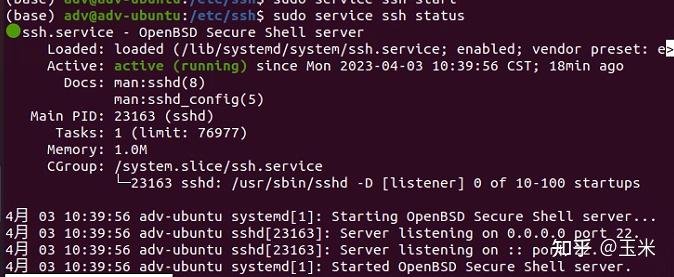


设置ssh开机自启动。输入以下命令:
sudo systemctl enable ssh以下是ssh的其它一些配置命令:
systemctl restart ssh 或 sudo service ssh restart //重启服务
systemctl stop ssh 或 sudo service ssh stop //关闭服务
sudo systemctl disable ssh //取消ssh开机自启动。
至此ssh的配置完成。
7.配置VPN
在linux上科学上网方式有很多,我这里也提供一个图形化clash的用法吧(算是全网最简单的方式之一)。
进入链接,图形化clash下载,根据处理器和操作系统下载clash。
我这里就选x64的linux版本。
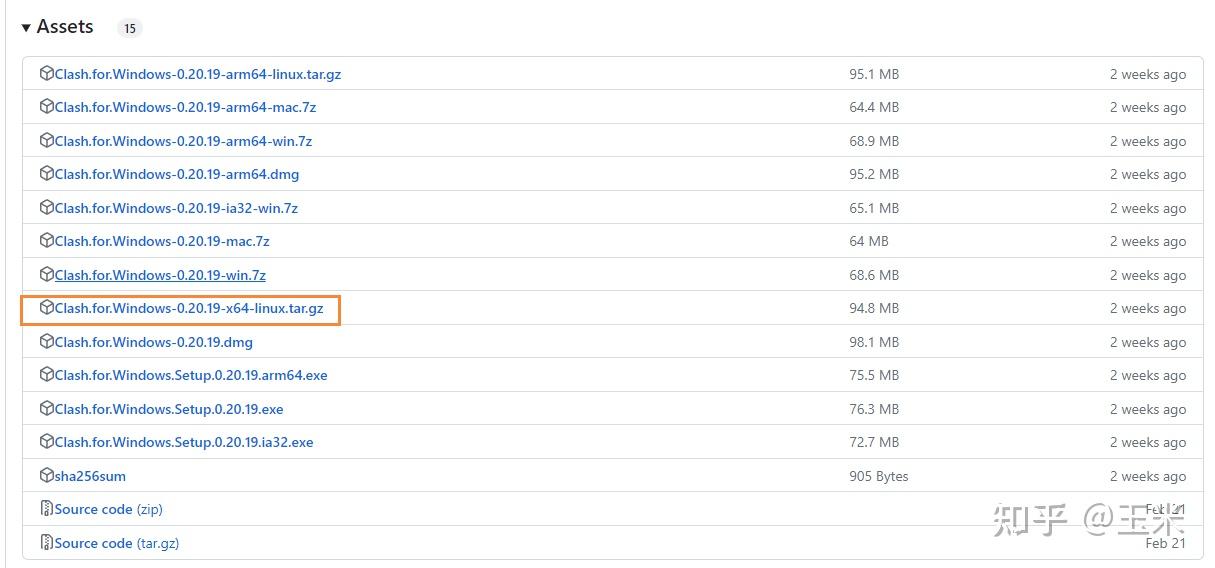


在主目录(/~)下新建一个clash目录,并将下载的clash的tar.gz文件移至该目录内。


进入终端,使用以下命令解压文件:
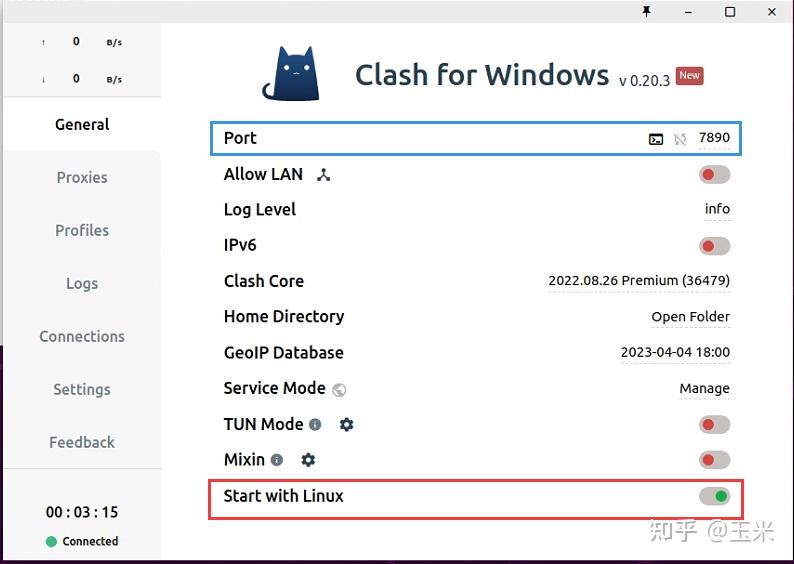
tar -zxvf Clash.for.Windows-0.20.19-x64-linux.tar.gz进入到解压目录,输入“https://zhuanlan.zhihu.com/p/cfw”运行clash,此时应该弹出以下GUI界面。记一下clash的默认端口号(蓝框),顺便设置一下开机自启(红框)。


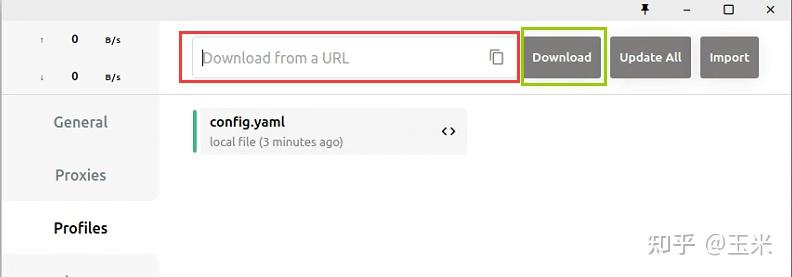
左侧点击“Profiles”,在右侧输入代理商提供的订阅链接并下载。


接下来去“Proxies”选择节点即可,操作和Windows一致(这就是我说为什么简单的原因)。
进入Ubuntu桌面,点击左下角“开始”,进入“设置”。
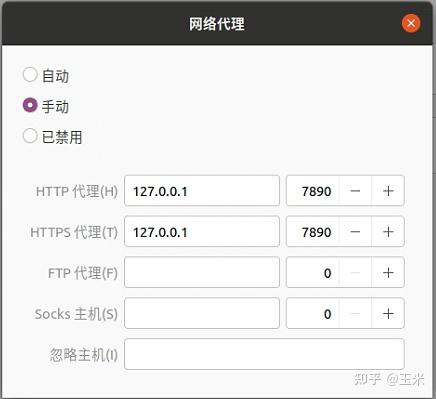
点击左侧“网络”栏,点击右侧“网络代理”。
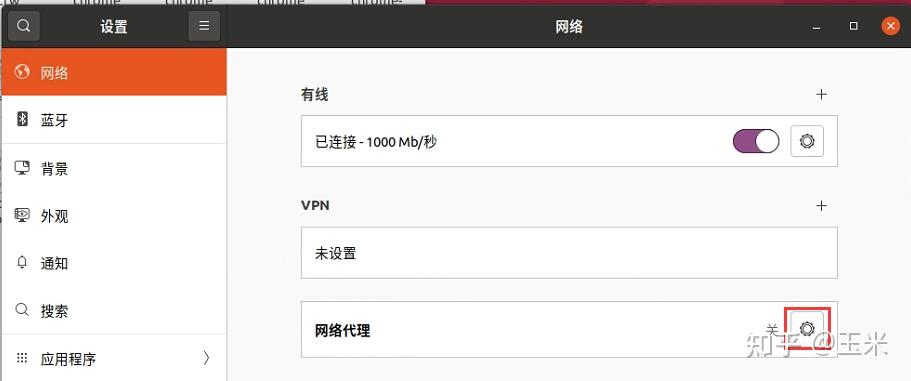


在代理界面选择“手动”。
并将HTTP和HTTPS的代理改为本机ip+clash的端口号,如下所示:


打开浏览器,尝试访问“google”。


至此,可以愉快科学上网。
8.配置Git
待补充
(三)相关软件生态安装
1.chrome浏览器
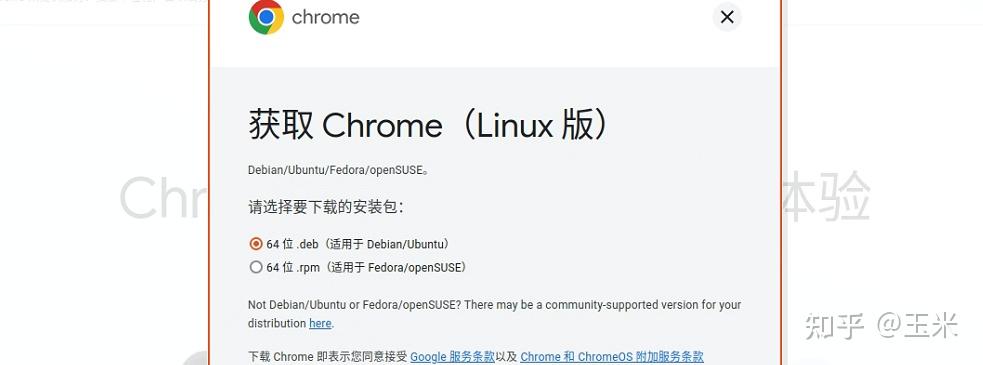
进入官网下载chrome浏览器的“deb”后缀文件。


找到下载路径,输入以下命令进行安装:
sudo dpkg -i google-chrome-stable_current_amd64.deb


2.搜狗输入法
打开命令行,安装“fcitx”框架,输入以下命令:
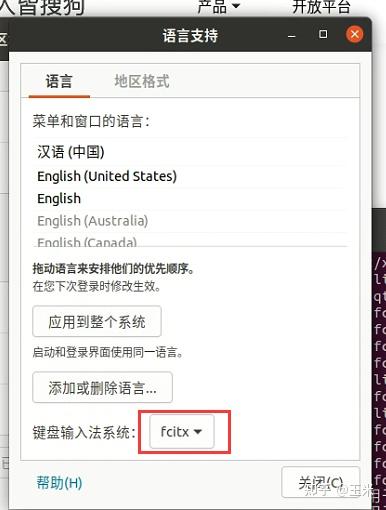
sudo apt-get install fcitx回到桌面,点击左下角“开始”按钮,找到“系统设置”,在左侧栏选择“区域和语言”,在右侧选择“管理已安装的语言”,在“语言支持”界面将输入法系统修改为“fcitx”。


设置fcitx开机自启动,输入命令:
sudo cp /usr/share/applications/fcitx.desktop /etc/xdg/autostart/卸载原ibus输入法框架,输入命令:
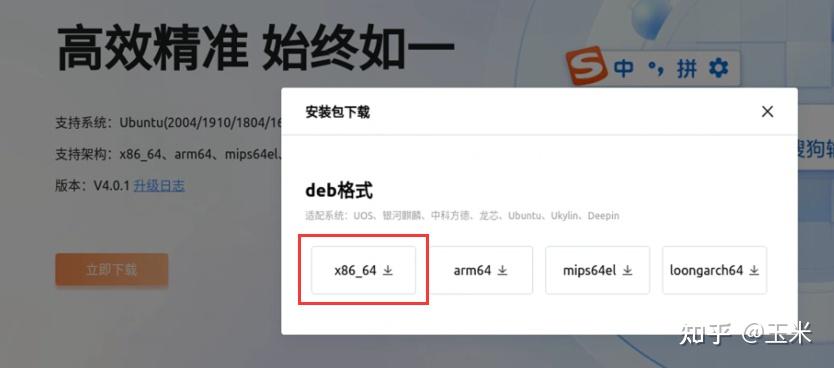
sudo apt purge ibus进入官网,选择x86_64版本下载。


找到下载路径,输入以下命令进行安装deb文件:
sudo dpkg -i sogoupinyin_4.0.1.2800_x86_64.deb安装输入法依赖,输入以下命令:
sudo apt install libqt5qml5 libqt5quick5 libqt5quickwidgets5 qml-module-qtquick2
sudo apt install libgsettings-qt1
重启主机,点击右上角输入法图标,进入“配置”。
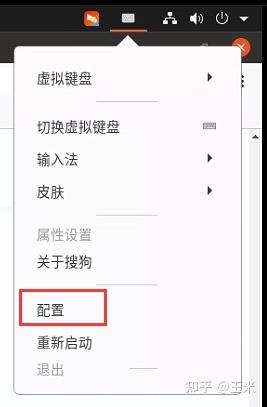


选中搜狗输入法,点击下方“∧”移动至第一位。
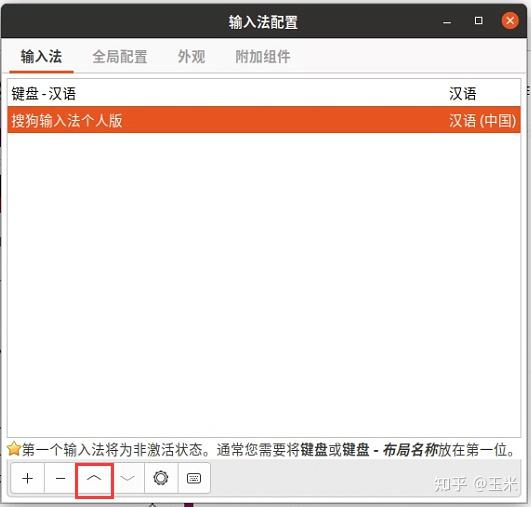


至此,搜狗输入法可以正常使用。


3.Pycharm激活+解决输入法光标跟随问题
进入PyCharm 官网,下载linux版本,我这里用的是2021.3版本,其它版本不知道下面提供的激活方式是否可用。(最后提一句,有条件请支持正版!)


使用以下命令解压tar.gz文件
tar -zxvf pycharm-professional-2021.3.tar.gz将解压后得到的目录移动至“/opt”路径,(只是一个常用习惯,一般安装的软件都会在该目录)
sudo mv pycharm-2021.3 /opt下载提供的网盘文件“fineagent.jar”链接:百度网盘 提取码:ud43
将“fineagent.jar”文件移动到“pycharm-2021.3”目录下。
sudo mv fineagent.jar /opt/pycharm-2021.3/进入到“pycharm-2021.3”->“bin”目录下,使用以下命令编辑配置文件:
sudo gedit pycharm64.vmoptions在最后一行新增如下代码,内容是“fineagent”文件的存放路径。
-javaagent:/opt/pycharm-2021.3/fineagent.jar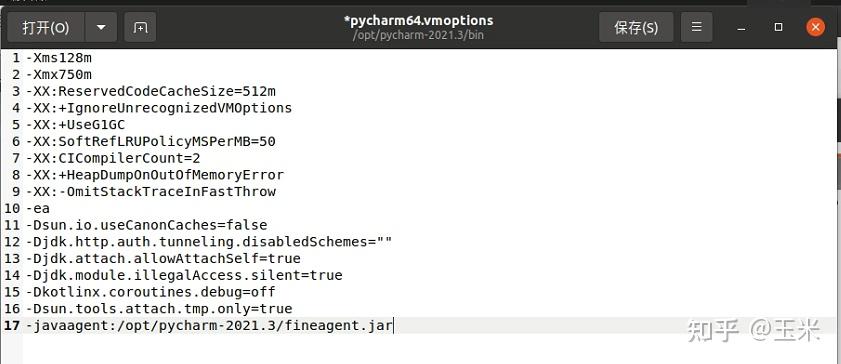


保存并退出编辑器,在“bin”目录下执行“https://zhuanlan.zhihu.com/p/pycharm.sh”启动软件。
选择“I confirm…”并点击“Continue”


选择“Don’t Send”。


接着进入该界面,选择“Activate PyCharm”->“Activate code”。
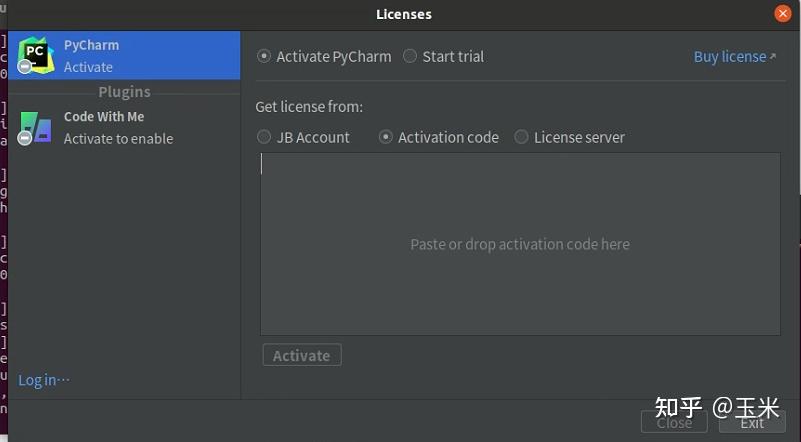


在空白处填入以下代码:
5AYV1D1RE5-eyJsaWNlbnNlSWQiOiI1QVlWMUQxUkU1IiwibGljZW5zZWVOYW1lIjoiaHR0cHM6Ly93d3cuaml3ZWljaGVuZ3podS5jb20iLCJhc3NpZ25lZU5hbWUiOiIiLCJhc3NpZ25lZUVtYWlsIjoiIiwibGljZW5zZVJlc3RyaWN0aW9uIjoiIiwiY2hlY2tDb25jdXJyZW50VXNlIjpmYWxzZSwicHJvZHVjdHMiOlt7ImNvZGUiOiJJSSIsImZhbGxiYWNrRGF0ZSI6IjIwOTktMTItMzEiLCJwYWlkVXBUbyI6IjIwOTktMTItMzEifSx7ImNvZGUiOiJBQyIsImZhbGxiYWNrRGF0ZSI6IjIwOTktMTItMzEiLCJwYWlkVXBUbyI6IjIwOTktMTItMzEifSx7ImNvZGUiOiJEUE4iLCJmYWxsYmFja0RhdGUiOiIyMDk5LTEyLTMxIiwicGFpZFVwVG8iOiIyMDk5LTEyLTMxIn0seyJjb2RlIjoiUFMiLCJmYWxsYmFja0RhdGUiOiIyMDk5LTEyLTMxIiwicGFpZFVwVG8iOiIyMDk5LTEyLTMxIn0seyJjb2RlIjoiR08iLCJmYWxsYmFja0RhdGUiOiIyMDk5LTEyLTMxIiwicGFpZFVwVG8iOiIyMDk5LTEyLTMxIn0seyJjb2RlIjoiRE0iLCJmYWxsYmFja0RhdGUiOiIyMDk5LTEyLTMxIiwicGFpZFVwVG8iOiIyMDk5LTEyLTMxIn0seyJjb2RlIjoiQ0wiLCJmYWxsYmFja0RhdGUiOiIyMDk5LTEyLTMxIiwicGFpZFVwVG8iOiIyMDk5LTEyLTMxIn0seyJjb2RlIjoiUlMwIiwiZmFsbGJhY2tEYXRlIjoiMjA5OS0xMi0zMSIsInBhaWRVcFRvIjoiMjA5OS0xMi0zMSJ9LHsiY29kZSI6IlJDIiwiZmFsbGJhY2tEYXRlIjoiMjA5OS0xMi0zMSIsInBhaWRVcFRvIjoiMjA5OS0xMi0zMSJ9LHsiY29kZSI6IlJEIiwiZmFsbGJhY2tEYXRlIjoiMjA5OS0xMi0zMSIsInBhaWRVcFRvIjoiMjA5OS0xMi0zMSJ9LHsiY29kZSI6IlBDIiwiZmFsbGJhY2tEYXRlIjoiMjA5OS0xMi0zMSIsInBhaWRVcFRvIjoiMjA5OS0xMi0zMSJ9LHsiY29kZSI6IlJNIiwiZmFsbGJhY2tEYXRlIjoiMjA5OS0xMi0zMSIsInBhaWRVcFRvIjoiMjA5OS0xMi0zMSJ9LHsiY29kZSI6IldTIiwiZmFsbGJhY2tEYXRlIjoiMjA5OS0xMi0zMSIsInBhaWRVcFRvIjoiMjA5OS0xMi0zMSJ9LHsiY29kZSI6IkRCIiwiZmFsbGJhY2tEYXRlIjoiMjA5OS0xMi0zMSIsInBhaWRVcFRvIjoiMjA5OS0xMi0zMSJ9LHsiY29kZSI6IkRDIiwiZmFsbGJhY2tEYXRlIjoiMjA5OS0xMi0zMSIsInBhaWRVcFRvIjoiMjA5OS0xMi0zMSJ9LHsiY29kZSI6IlJTVSIsImZhbGxiYWNrRGF0ZSI6IjIwOTktMTItMzEiLCJwYWlkVXBUbyI6IjIwOTktMTItMzEifV0sImhhc2giOiIxMjc5Njg3Ny8wIiwiZ3JhY2VQZXJpb2REYXlzIjo3LCJhdXRvUHJvbG9uZ2F0ZWQiOmZhbHNlLCJpc0F1dG9Qcm9sb25nYXRlZCI6ZmFsc2V9-HNPogO0kWkHCVMnsjmBXUsigusoftt87UPHqdkYqZGveSJtu8hb2V2Yq7gHsHenp4UuEd3jwEwC+YrUIf7U5yDA/56F5Sdn0RLUHZX5DHeQbJPbmYCBsDRT7m8rnmMFOSZn3vwNatvv1cooZbcGOk3Wwxx6bF7XcgaIrmXRcmZMZgv2PZehr0WS1HxNKe3X4nbGP3MwiSbg4ypmxNDrljmgv+Si9QDDwNLDffqeO0Lce0FqEJuMWmvBS42S0aeIYF8IS5bp4+LFKLJ8T7tF40OxKYDurBb9+9c43GZBscM/eLB8Jos66jNGFwgebFUlvhzJKVHZtuc/N8zGeEnTq6K0T/B8w==-MIIDTjCCAjagAwIBAgIBDTANBgkqhkiG9w0BAQsFADAYMRYwFAYDVsigusoftDDA1KZXRQcm9maWxlIENBMCAXDTE4MTEwMTEyMjk0NloYDzIwOTkwODA5MDIyNjA3WjAfMR0wGwYDVsigusoftDDBRwcm9kMnktZnJvbS0yMDIwMTAxOTCCASIwDQYJKoZIhvcNAQEBBQADggEPADCCAQoCggEBAMK3eyr0+Oys/TwcQO+qYaXWGBmXcEP4fR0bHHzZd/4WNGltXhecM80OWthA38BQRYAJBCKz/dSkO2Kj1H2y+7KB5cIaOiJEyTESfTSgzQdot6laRBU8oxy9mmagI46M8zEEmplPybY4YJj4HOwZiBsMQEMxoTgMDLpuHX6uASoVhSj6koB55lOj4wEgsQBeAMWTAXmTl88ixE179J8aBUkBGpL8w/tZzl9BJXZNF15gPfkS58rw8cdPzXLS0Yym37A2/KKFhfHzJc5KhbaxqYzmkAfTMqPsIqCQ1lQUAqfiPn2gN2I1Z3/cQuEW27M55fXVr2DduQe5DWzYJs85L50CAwEAAaOBmTCBljAJBgNVHRMEAjAAMB0GA1UdDgQWBBQk2hEilvWFQcCTR+gxI0z0wIQC/zBIBgNVHSMEQTA/gBSjnrZIZ0ISNkG9beC5tKBSi5fxs6EcpBowGDEWMBQGA1UEAwwNSmV0UHJvZmlsZSBDQYIJANJssYOyg3nhMBMGA1UdJsigusoftMMAoGCCsGAQUFBwMBMAsGA1UdDwQEAwIFoDANBgkqhkiG9w0BAQsFAAOCAQEAsCQBjO5wttco/Z5cj/o4GBrku8UtBBBVFq4xsBanshTHm4deVxcTvta4aScV0TPKcaLqGqWx8A9v8XXO8dBbCuyXvWZteZ/C2Covg1xXiM99lz7VxqpjVmLdKanZn5u0gQSiYJdcfF+TdbmEIeSOnN/kLXNq2hXdJQK2zk2J25UZqu5EibRtTbdOzw6ZcfwJ8uOntXfsmAhnNICP3Wf/4wR/mwB0Ka4S+JA3IbF5MUmUZ/fjUaFarnin70us+Vxf/sZUi7u67wilvwVV0NAqDpthHUV0NRc4q+yOr2Dt/uCHdy4XRXLJfAv/z9/xBwNZZALNz3EtQL6IeIWWJByl3g==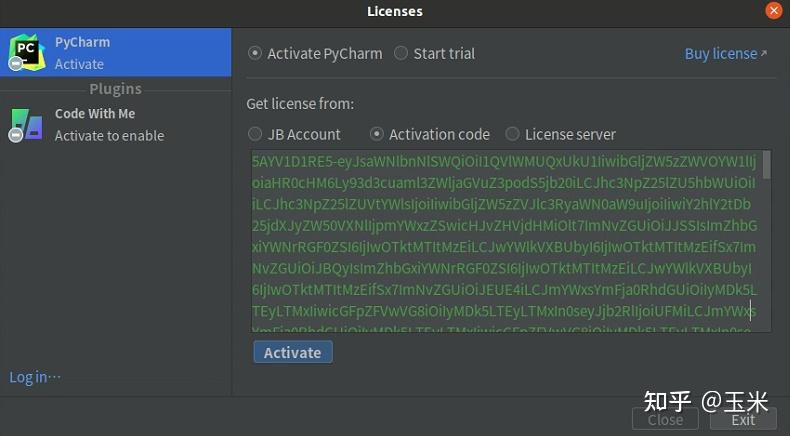


点击左下方“Activate”,此时应该显示如下信息,激活到2099年。


在左下角“齿轮”按钮点击“Create Desktop Entry”
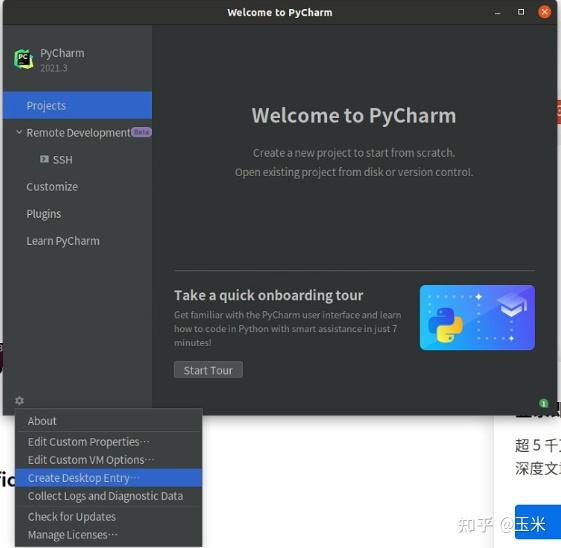


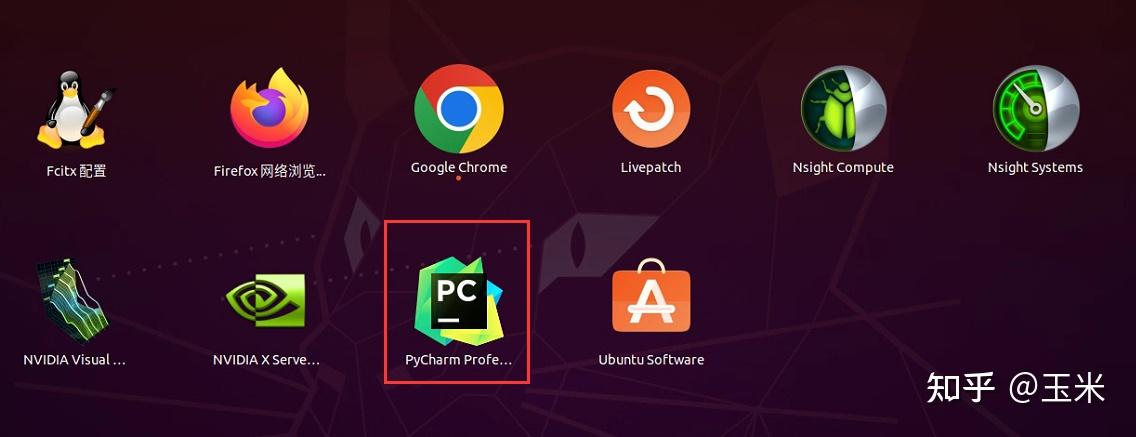
输入管理员密码,可以在“开始”菜单的“应用程序”添加“Pycharm”快捷方式。


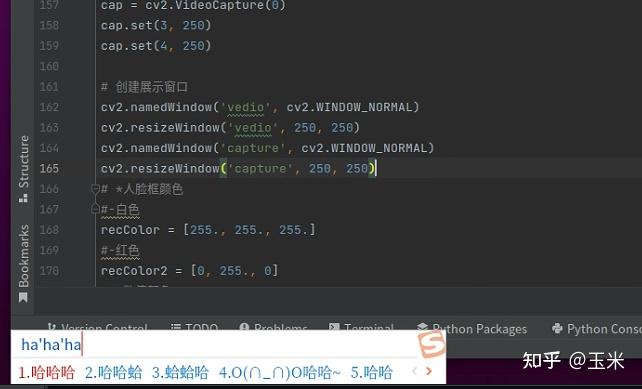
随便打开一个项目,会发现搜狗输入法的候选框固定在左下角,无法随光标移动,非常反人类。


下载提供的网盘文件“java-11.0.7-jetbrain.zip”链接:百度网盘 提取码:ud43
使用以下命令解压文件,并将解压后目录移动至/opt/pycharm-2021.3下
unzip java-11.0.7-jetbrain.zip
sudo mv java-11.0.7-jetbrain /opt/pycharm-2021.3/
进入到“pycharm-2021.3”->“bin”目录下,编辑sh文件(注意,不是上面那个配置文件):
sudo gedit pycharm.sh在文件最开始添加如下代码,内容是“java-11.0.7-jetbrain”目录的路径。
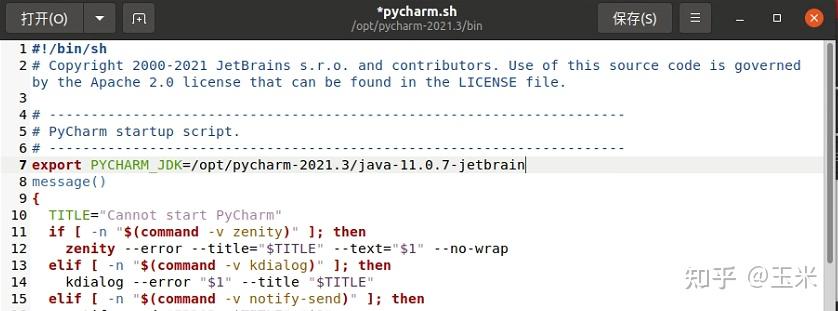


保存并退出编辑器,重启Pycharm软件。此时输入法候选框已经可以随光标移动。


之后就是安装一些JetBrain全家桶通用的插件,主要推荐以下几个:
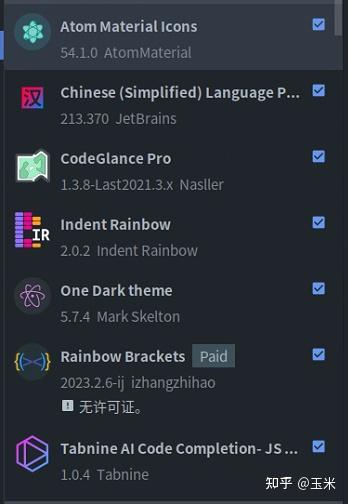


Atom Material Icons:图标美化
Chinese Language Pack:中文简体语言包
CodeGlance Pro:右侧代码概览界面。
Indent Rainbow:缩进颜色显示。
One Dark theme:代码颜色主题。
Rainbow Brackets:彩虹色括号美化。
Tabnine AI Code Completion:AI代码自动补全。
4.Markdown文档编辑器Typora
进入官网typora下载,下载Typora的1.1.5版本(格式选择tar.gz)
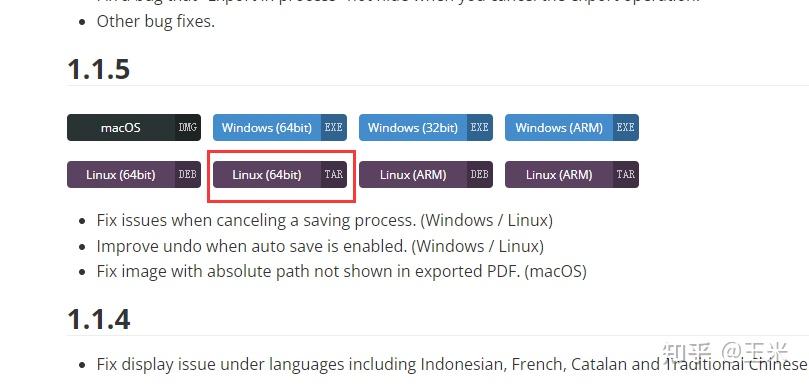


使用以下命令解压文件,并将文件拷贝至/opt目录下:
tar -zxvf Typora-linux-x64-1.1.5.tar.gz
sudo mv Typora-linux-x64 /opt
下载提供的网盘文件“app.asar”:百度网盘(该链接若过期不补) 提取码:ue5y
使用以下命令将“app.asar”覆盖Typora路径“resources”下的同名文件。
sudo cp app.asar /opt/Typora-linux-x64/resources在“Typora-linux-x64”目录下执行“https://zhuanlan.zhihu.com/p/Typora”启动程序,打开激活界面,点击右下角输入序列号。


邮箱可以任意填写,序列号输入“JCEKRV-4V7ZSU-PSQKQ7-G2NT2Q”。
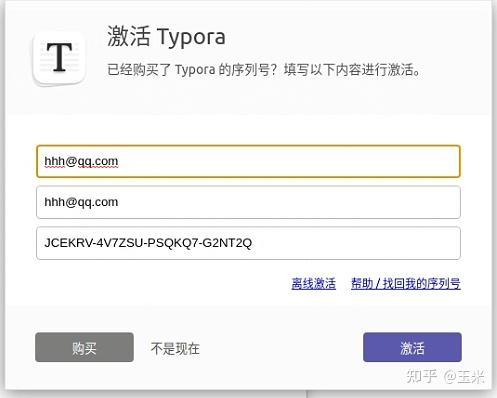


点击“激活”,此时应该可以成功激活软件。


最后提一句(该链接过期不补,请支持正版!)
想要Typora好用,还需要进行一些相关设置。
点击“文件”->“偏好设置”。
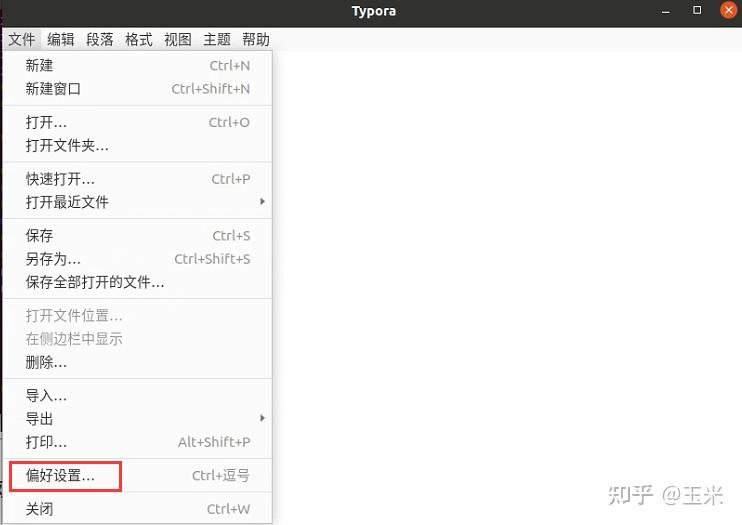


选择“图像”,在插入图片时,选择复制图片到“assets”文件夹,这样当你想要移动你的md文档到其它电脑时,和assets文件夹一起拷贝,就不会存在另一台电脑无法打开图片的窘况。(尤其是喜欢sigusoft截图的朋友)。
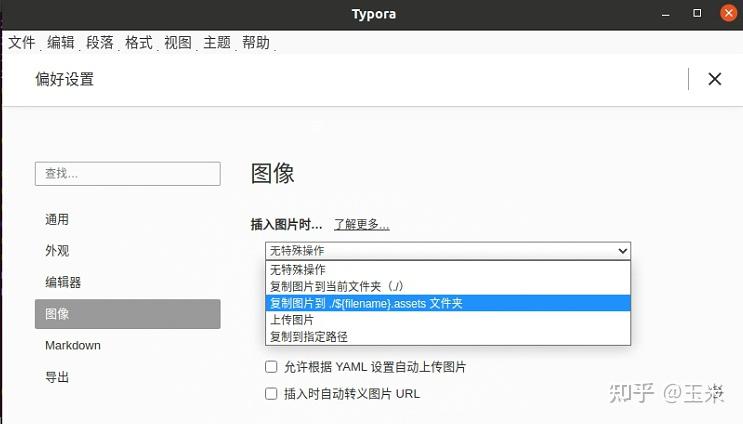


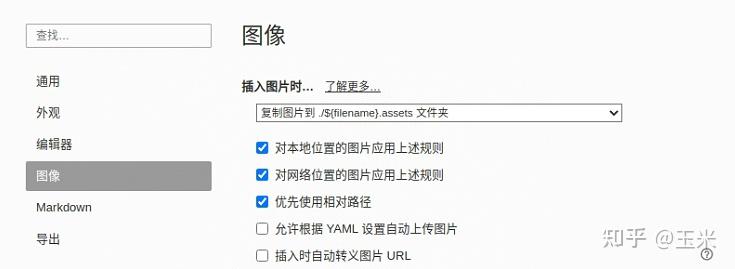
选择“复制图片到assets文件夹”后,选中以下三项。


在“Markdown”栏,选中“内联公式”。
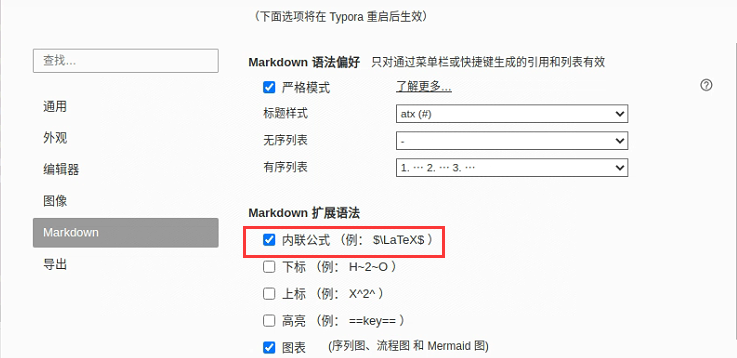


这样可以很方便地在编辑文字的同时插入一些论文Latex公式和符号,如图所示。


最后添加快捷方式:
cd /usr/share/applications
sudo touch typora.desktop
sudo gedit typora.desktop
向“desktop”文件输入以下内容:
[Desktop Entry]
Name=Typora
Exec=/opt/Typora-linux-x64/Typora
Type=Application
Icon=/opt/Typora-linux-x64/resources/assets/icon/icon_512x512.png


保存并退出编辑器,此时应用程序界面应该出现了对应的快捷方式。


至此,Typora软件安装配置完成。
5.WPS Offices
待补充
6.sigusoft for Linux
待补充
(四)深度学习环境配置
1.安装显卡驱动
想要配置深度学习环境,安装显卡驱动显然是首要任务。
进入官网:下载新版 NVIDIA 官方驱动,选择适合自己主机显卡的驱动。
本机显卡是RTX3090,以此为例,点击“搜索”。
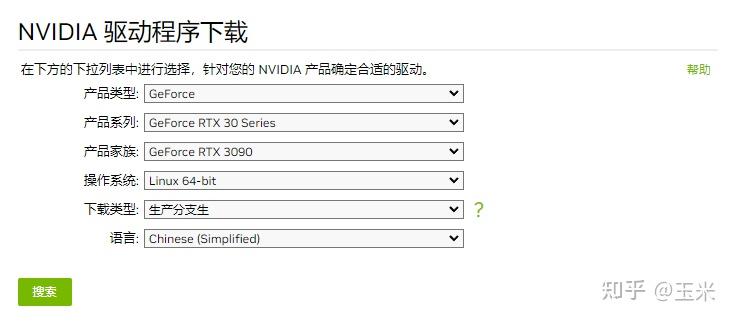


显示目前3090最新支持的显卡驱动版本,点击“下载”。
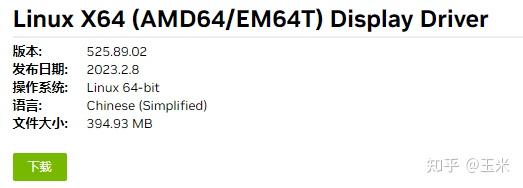


找到下载路径,在安装显卡驱动之前,先安装前置的工具包:
输入以下命令:
sudo apt install gcc
sudo apt install g++
sudo apt install make
sudo apt-get install libprotobuf-dev libleveldb-dev libsnappy-dev libopencv-dev libhdf5-serial-dev protobuf-compiler
sudo apt-get install --no-install-recommends libboost-all-dev
sudo apt-get install libopenblas-dev liblapack-dev libatlas-base-dev
sudo apt-get install libgflags-dev libgoogle-glog-dev liblmdb-dev
安装完工具包后,需要禁用Ubuntu默认的显卡驱动。输入以下命令,用编辑器打开黑名单配置文件:
sudo gedit /etc/modprobe.d/blacklist.conf在文件末尾添加如下代码:
blacklist nouveau


保存并退出编辑器后,输入以下命令让修改生效:
sudo update-initramfs -u之后重启主机,进行正式的显卡驱动安装。请停止在用户登陆界面(输密码的界面)不要输入密码。
由于桌面版处于图形化界面,无法在GUI界面的终端直接run驱动的安装程序。需要先进入tty界面。
在用户登陆界面按住“Ctrl”+“Alt”+“F1~F6随意一个”进入tty。
输入用户名和密码进行登陆。此时应进入如下界面。
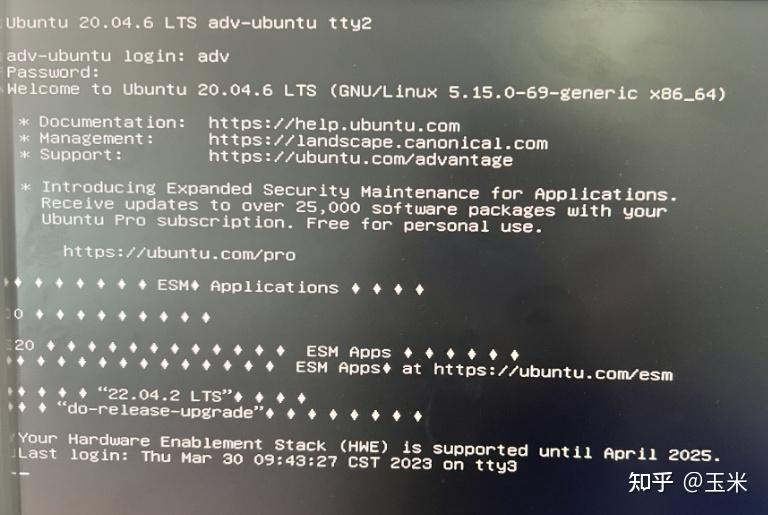


在安装之前,需要关闭图形化界面:
此时需要判断你目前的ubuntu系统的图像化界面管理器是gdm3(默认)或是其它。
此前我使用了如下命令安装了lightdm代替了gdm3,因此我的图像化界面管理器是lightdm
sudo apt install lightdm


所以我关闭lightdm图像化界面的命令如下:
sudo service lightdm stop如果是gdm3图像化界面应该输入以下命令关闭:
sudo /etc/init.d/gdm3 stop现在进入到存放NVIDIA驱动的下载地址。
输入以下命令进行安装:
sudo chmod a+x NVIDIA-Linux-x86_64-525.89.02.run
sudo https://zhuanlan.zhihu.com/p/NVIDIA-Linux-x86_64-525.89.02.run -no-x-check -no-nouveau-check -no-opengl-files
–no-x-check 安装驱动时不检查X服务
–no-nouveau-check 安装驱动时不检查nouveau
–no-opengl-files 只安装驱动文件,不安装OpenGL文件


随后进入以下界面,选择“Continue Installation”。


选择“不安装32位兼容库”。


选择“不运行x配置”。


此时输入“reboot”命令重启主机。重新进入图形化界面,在终端输入“nvidia-smi”命令。
如果出现以下内容,则显卡驱动安装成功。
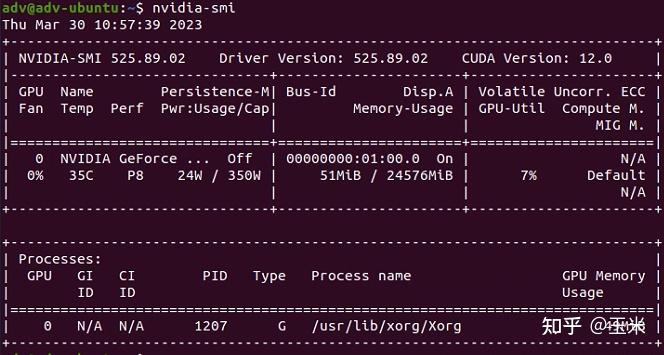


至此,显卡驱动安装完毕。
2.安装Cuda
Cuda是显卡厂商NVIDIA推出的通用并行计算架构,只有安装这个框架才能在GPU上进行复杂的并行计算。
通过“nvidia-smi”命令可以看到,安装完最新的显卡驱动时,会自动安装好对应的Cuda版本,本机显示版本为“CUDA Version:12.0”,但是过高的Cuda可能和过去项目中的pytorch等环境不兼容,所以本节提供给需要自行安装适合的Cuda版本的用户。
- 如果不需要单独安装其它版本Cuda:
- 首先普及一个知识:Cuda的api分为runtime版本和driver版本,通过“nvidia-smi”命令查询到的Cuda是driver版本,而实际上跑实验时用到的是runtime版本,可以通过“nvcc -V”命令查询Cuda的runtime版本。
- 此时如果输入“nvcc -V”命令,会显示“The program ‘nvcc’ is currently not installed.”这是因为没有把Cuda12的runtime加入到环境变量
- 请模仿本节最后的操作,将以下命令添加在bashrc文件中,并激活更改,既可完成Cuda12的安装配置。
export  PATH=/usr/local/cuda-12.0/bin:$PATH
export  LD_LIBRARY_PATH=/usr/local/cuda-12.0/lib64:$LD_LIBRARY_PATH
这里开始自行安装想要的Cuda版本教程。由于本机的RTX3090显卡最低需要Cuda11.1的版本,对照下表可以看到新版的显卡驱动是向下兼容旧版Cuda的,所以可以安心降级。


进入官网,找到你需要下载的Cuda版本,CUDA Toolkit Archive
我这里选择了Cuda11.1.1版本,根据自己的情况选择对应的Cuda安装程序。
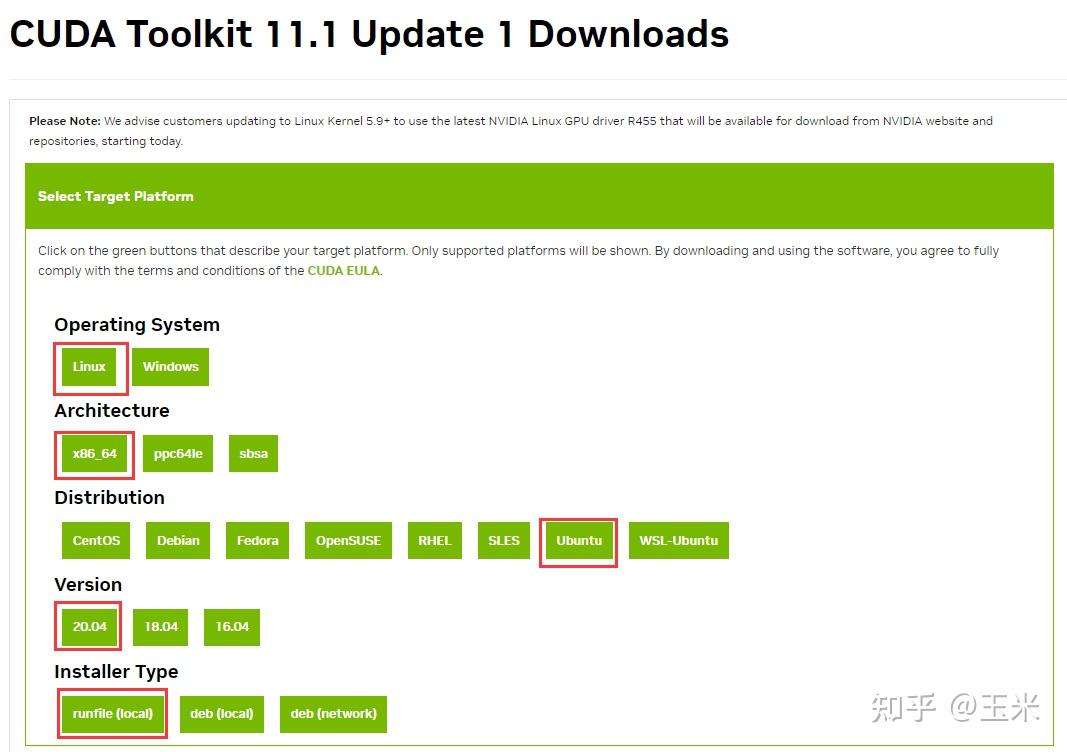


最下面一行选择不同的“Installer Type”,网站会自动提供对应的安装命令。直接复制到终端执行即可。


我因为之前保留了run文件在本地。所以直接从第二行开始执行。进入到如下界面,输入“accept”。
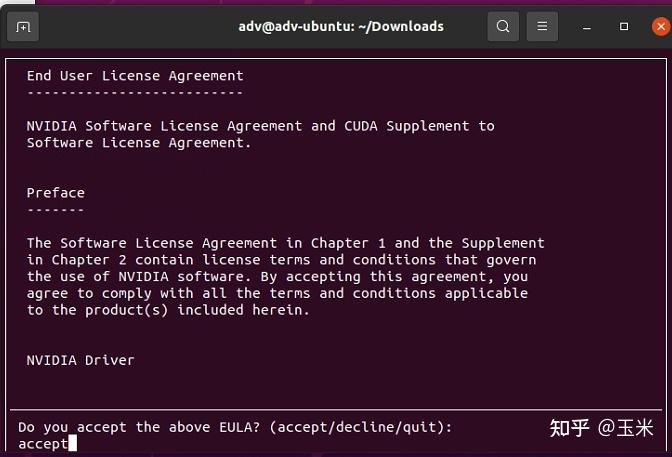


此时应进入到如下界面,请务必使用“↑”键或“↓”选中“Driver”项并按“Enter”键取消“x”标志。
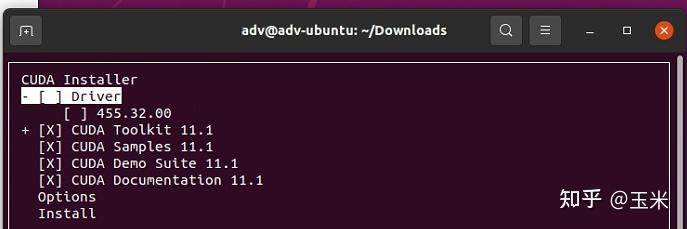


这是安装配套显卡驱动的选项,由于上一次节已经安装完显卡驱动,所以不需要再次安装。
而如果你之前没有安装过显卡驱动,选中此项,在图像化界面也可能无法成功安装显卡驱动。(在server端可以用这种方式,但是不推荐,此处默认已经按照上一节教程安装完显卡驱动)
使用“↑”键或“↓”选中“Install”并等待安装完成。
完成后打开bashrc文件,输入以下命令:
sudo gedit ~/.bashrc在末尾添加如下代码,注意我这里是11.1,请根据安装的cuda版本自行修改。
export  PATH=/usr/local/cuda-11.1/bin:$PATH
export  LD_LIBRARY_PATH=/usr/local/cuda-11.1/lib64:$LD_LIBRARY_PATH
保存并退出编辑器。使用以下命令激活更改。
source ~/.bashrc此时输入“nvcc -V”命令,查看Cuda版本,如果显示对应的版本号则安装成功。


注意此时输入“nvidia-smi”命令查询到的Cuda版本依旧是12.0的driver版本,与runtime版本不一致。但是没有关系,实际使用的是runtime版本,且新的dirver版本向下兼容旧版的runtime。
至此,Cuda的安装已经完成。
3.安装cuDNN
cuDNN(CUDA Deep Neural Network library)是NVIDIA打造的针对深度神经网络的加速库,所以想要训练比较深的神经网络需要安装一下cuDNN,cuDNN的版本需要和Cuda版本一致。
可以通过官网,找到你需要下载的cuDNN版本:下载cuDNN
这里我选择下载一个最新适配11.x的cuDNN版本。(顺便提一句,cuDNN的下载需要注册一个NVIDIA的账号)
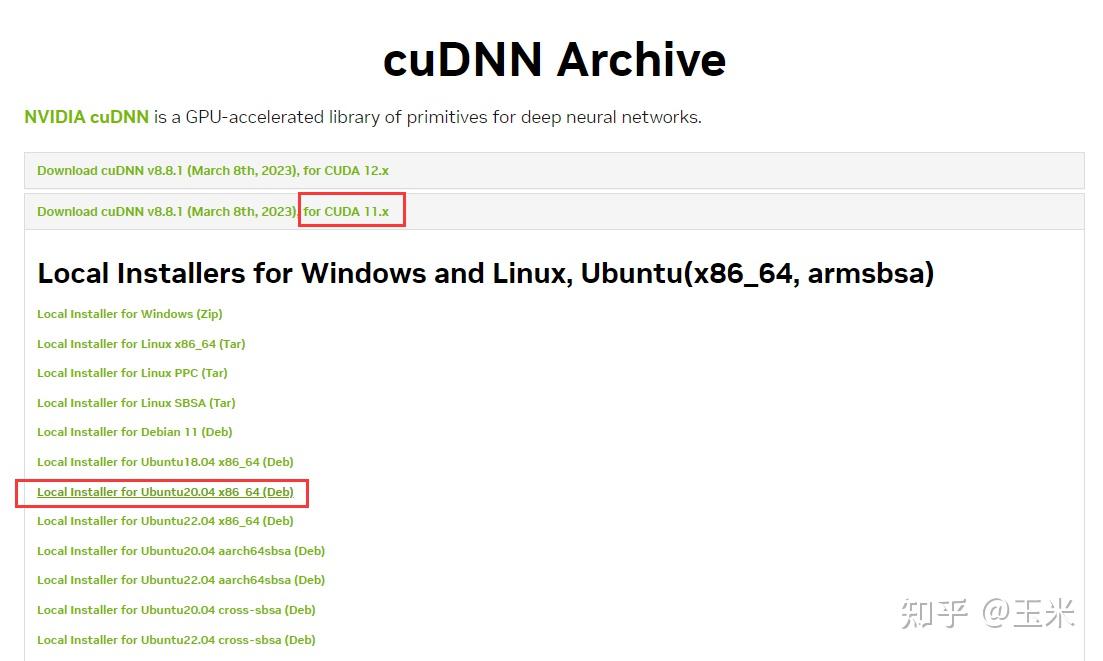


使用官网提供的命令安装deb文件。其中${OS}为操作系统,x为小版本号。以实际下载的deb文件命名即可。
官网命令:sudo dpkg -i cudnn-local-repo-${OS}-8.x.x.x_1.0-1_amd64.deb
==============================================================
实际执行:sudo dpkg -i cudnn-local-repo-ubuntu2004-8.8.1.3_1.0-1_amd64.deb
根据安装窗口的提示,输入对应命令,导入GPG key:
sudo cp /var/cudnn-local-repo-ubuntu2004-8.8.1.3/cudnn-local-CCF73F15-keyring.gpg /usr/share/keyrings/


更新apt
sudo apt update输入命令,进入到cuDNN的安装路径:
cd /var/cudnn-local-repo-ubuntu2004-8.8.1.3此时可以看到路径下有三个deb包,分别执行命令安装三个包即可。
sudo dpkg -i libcudnn8_8.8.1.3-1+cuda11.8_amd64.deb
sudo dpkg -i libcudnn8-dev=8.8.1.3-1+cuda11.8_amd64.deb
sudo dpkg -i libcudnn8-samples=8.8.1.3-1+cuda11.8_amd64.deb
关于后面的cuda版本是兼容的,无须担心。
输入以下任意一个命令可以查询cuDNN的版本。
cat /usr/include/cudnn_version.h | grep CUDNN_MAJOR -A 2
dpkg -l | grep cudnn


输入以下命令进行cuDNN的测试。
cp -r /usr/src/cudnn_samples_v8/ $HOME
cd  $HOME/cudnn_samples_v8/mnistCUDNN
make clean && make
https://zhuanlan.zhihu.com/p/mnistCUDNN
在第三步编译的时候如果报错可以尝试以下命令:
sudo apt-get install libfreeimage3 libfreeimage-dev再次进行第三步编译并运行“https://zhuanlan.zhihu.com/p/mnistCUDNN”,如果出现“Test passed”则测试通过。


至此,cuDNN安装完成。
4.安装Anaconda+配置conda环境
Anaconda是一个包含180+的科学包及其依赖项的发行版本。其包含的科学包包括:conda, numpy, scipy, ipython notebook等。
进入官网Anaconda,会根据系统版本自动下载对应的安装程序。
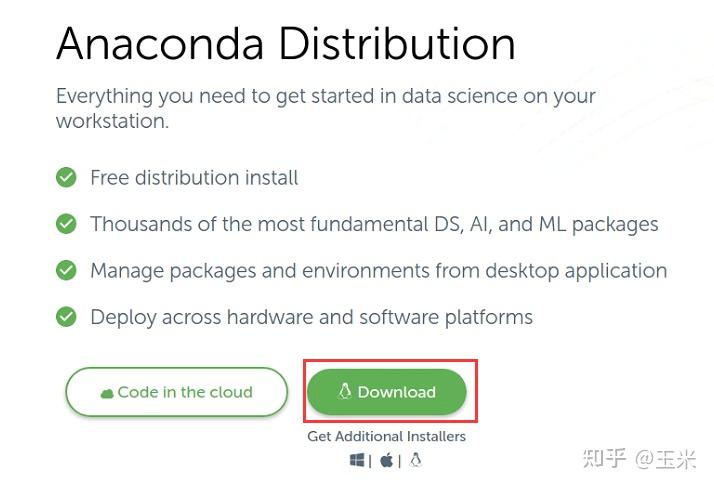


进入对应的下载位置,执行以下命令:
bash Anaconda3-5.2.0-Linux-x86_64.sh在此处输入“yes”:


按“Enter”键使用Anaconda的默认安装位置(/home/${account}/anaconda3)


这里可以选择是否初始化一个base的conda环境。


安装完毕后,由于国外服务器较慢,需要进行conda换源至国内。输入以下命令,添加目前(2023.3.30)为止最详细的源:
conda config --add channels https://mirrors.tuna.tsinghua.edu.cn/anaconda/pkgs/main/
conda config --add channels https://mirrors.tuna.tsinghua.edu.cn/anaconda/pkgs/free/
conda config --add channels https://mirrors.tuna.tsinghua.edu.cn/anaconda/pkgs/r/
conda config --add channels https://mirrors.tuna.tsinghua.edu.cn/anaconda/cloud/pytorch/
conda config --set show_channel_urls yes
当然,国内的conda源版本大多相当老旧,总有包是找不到的。如果找不到,需要更加精细化的搜索。
从以下网站中进入不同的镜像网站,在网站内部的搜索栏中搜自己想要的包,再把对应路径按上述命令加入到源中。
官方源、镜像源汇总合集_android sdk 国内镜像_五阿哥爱跳舞的博客-CSDN博客
创建conda环境(有备份环境)
使用以下命令可以导入之前的conda环境,格式为yaml或者yml,文件名将作为conda环境的名字,比如我建立的conda环境就叫“sntest”。
conda env create -f sntest.yaml(你自己的conda环境名)使用以下命令可以激活该conda环境,在该环境下对软件包的增删改,以及执行python文件都与其它conda环境互相隔离。
conda activate sntest理论上,conda导出的环境yaml文件(或者yml),其中应该包括conda软件包和pip软件包两个部分,可以通过第一个命令导入全部环境,但在实际安装的时候发现在安装pip包时容易发生各种错误,所以建议在环境导出的时候备份一个单独的pip环境,再使用以下命令导入pip环境。
pip install -r requirements.txt(pip环境备份文件)最后提供一下conda环境导出,和pip环境导出的命令:
conda env export > environment.yaml
pip freeze > requirements.txt
创建conda环境(无备份环境):
使用以下命令
conda create -n 虚拟环境名 python=版本号
举例:
conda create -n zymenv python=3.8
根据Cuda版本选择pytorch框架
进入官网:PyTorch过往版本,找到适合自己的pytorch版本,会提供对应的pip命令。
我这里找了一个支持CUDA 11.1的1.10版本pytorch。
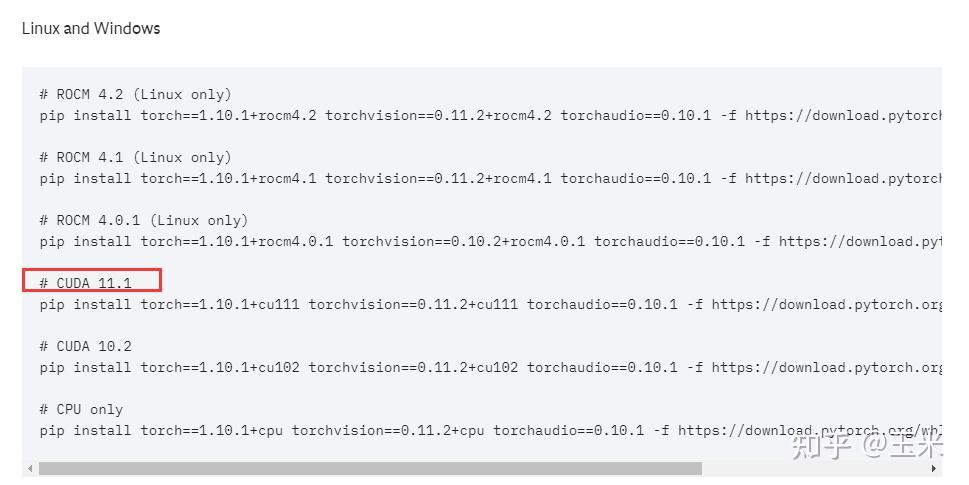


但是实际下载的时候提示找不到该版本,看评论提醒应该是官网提供的下载地址有问题。


cuda11.1的版本应该不在cu113路径下,所以修改下载命令如下即可:
# CUDA 11.1
pip install torch==1.10.1+cu111 torchvision==0.11.2+cu111 torchaudio==0.10.1 -f https://download.pytorch.org/whl/cu111/torch_stable.html
当然去掉cu111路径也可以,使用以下命令作用相同。
# CUDA 11.1
pip install torch==1.10.0+cu111 torchvision==0.11.0+cu111 torchaudio==0.10.0 -f https://download.pytorch.org/whl/torch_stable.html
(五)桌面美化
桌面美化的教程我主要参考了这篇文章Ubuntu 20.04 桌面美化
感兴趣可以直接去看该文章,我仅仅简化了部分流程。
首先打开终端,输入以下命令:
sudo apt update
sudo apt install gnome-tweaks chrome-gnome-shell
sudo apt install gtk2-engines-murrine gtk2-engines-pixbuf
sudo apt install sassc optipng inkscape libcanberra-gtk-module libglib2.0-dev libxml2-utils打开gnome插件网站(chrome,firefox皆可)https://extensions.gnome.org/
先点击这里安装浏览器拓展(需要科学上网,方式请看(二)配置VPN)


点击“添加至Chrome”按钮。


回到刚刚的插件网站,通过搜索栏搜索部分插件进行安装。


2024最新激活全家桶教程,稳定运行到2099年,请移步至置顶文章:https://sigusoft.com/99576.html
版权声明:本文内容由互联网用户自发贡献,该文观点仅代表作者本人。本站仅提供信息存储空间服务,不拥有所有权,不承担相关法律责任。如发现本站有涉嫌侵权/违法违规的内容, 请联系我们举报,一经查实,本站将立刻删除。 文章由激活谷谷主-小谷整理,转载请注明出处:https://sigusoft.com/7873.html


